Delightful Williams Pear Tart: Bake in 1 Hour
Craving the best Bake Williams Pear Tart in 1 Hour Delightfully? This simple recipe intertwines juicy pears with a buttery crust for a delightful dessert.

- Get Ready to Bake
- A Taste of Tradition
- Why You’ll Love It
- Essential Ingredients Guide for Your Baking Adventures
- Mastering the Art of Professional Cooking: Steps to Create a Delightful Williams Pear Tart
- Pro Tips & Secrets for Your Williams Pear Tart
- Perfect Presentation Make Your Tart Shine
- Storage & Make-Ahead Tips
- Creative Variations to Switch Things Up
- Complete Nutrition Guide: Know What You're Eating
- Encouragement for You!
- Frequently Asked Questions
- Recipe Card
Get Ready to Bake
Oh my gosh, have you ever found yourself staring at a bowl of ripe pears, wondering what to do with them? just a few weeks back, i had that exact moment.
My little kitchen felt like a fruit market exploded with all the goodies from the farmer's market. the sweet aroma of those williams pears was too tempting! i decided it was the perfect time to bake williams pear tart in 1 hour delightfully .
Honestly, it transformed my vibe that day!
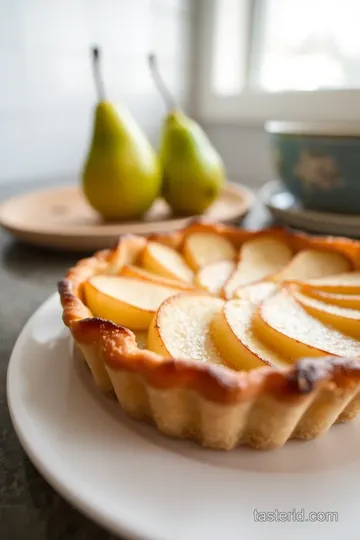
Imagine pulling a golden, buttery tart from the oven, the sweet scent wafting through your home, and knowing it only took an hour of your life.
You can’t help but feel like a baking pro. trust me; this tart is more than just a quick pear tart recipe ; it’s a piece of art that’ll impress anyone at your dinner table!
A Taste of Tradition
This tart is rooted in the heart of french pastry traditions , where every bite tells a story. pear tarts have been enjoyed for centuries; it’s amazing how much history is packed in a single slice! in today’s world, this dessert remains a crowd-pleaser, making an appearance at family gatherings, holiday dinners, and even casual weeknights when you need a little pick-me-up.
Now, let’s talk time. you can whip up this masterpiece in one hour . this includes a quick prep time of about 20 minutes and just 40 minutes in the oven.
Nope, you don’t need to be a pro—just some basic baking skills. and guess what? it won’t break the bank either! depending on the ingredients you already have, you can make this tart for under $15, yielding about 8 servings —perfect for sharing (or not)!
Why You’ll Love It
Now for the best part—let’s chat about the perks of this dessert. first off, it’s a healthy dessert option ! the williams pears are not just tasty; they’re also filled with fiber and vitamins, making it an excellent fruit choice.
Plus, the buttery tart crust balances those sweet, savory flavors perfectly. it’s not just an ordinary dessert, folks; it’s an elegant dessert idea that fits right in on special occasions.
Wanna talk variations? you can customize the filling! add in some cinnamon for that cozy fall vibe, or give it a twist with vanilla extract to enhance the flavor.
This is a recipe with so many possibilities—each variation is sure to be a hit!
Feel like celebrating? this tart makes a fantastic holiday dessert idea or even a sweet finale for a fancy dinner party.
And you can always pair it with a scoop of ice cream or a dollop of whipped cream for that extra touch of comfort food goodness.
Time to switch gears! Let’s dive into the star of the show: the ingredients you’ll need to create this delightful oven-baked pear dessert . Get ready to impress yourself and your guests!
Essential Ingredients Guide for Your Baking Adventures
When it comes to baking, nothing is more essential than knowing your ingredients. today, we're diving into the nitty-gritty of those must-have components that will elevate your baking game — especially when you whip up a delightful williams pear tart .
Trust me, knowing your way around these basics is like having a secret weapon in the kitchen!
Premium Core Components
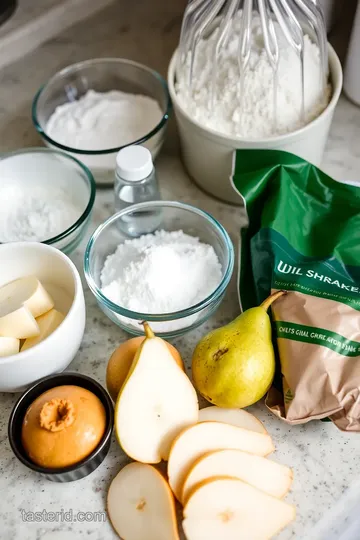
To start off, let’s break down what you need , along with those handy measurements.
- All-purpose flour: 1 ½ cups (190g). This is your stable mate for the crust! Look for something that feels soft and springy.
- Unsalted butter: ½ cup (113g), chilled and cubed. Make sure it’s firm — that’s what’ll give you that buttery tart crust.
- Granulated sugar: ¼ cup (50g) for sweetness. Check for a fine texture; no one wants gritty dessert.
- Vanilla extract: 1 tsp for that warm flavor that will make your taste buds dance!
Storage Guidelines and Freshness Tips
Alright, you’re gonna want to keep these ingredients fresh. flour can last up to a year if stored in an airtight container in a cool, dry place, but keep your butter in the fridge and use it within a month.
And don’t forget to check expiration dates on your vanilla extract; it can be tempting to keep it forever — trust me, it doesn’t improve with age!
Signature Seasoning Blend
Now, what about those tantalizing flavors? Here’s where spice and seasoning come into play.
- Cinnamon: This is your go-to for that perfect hint of warmth in a cinnamon pear tart . It’s like a hug in a slice!
- Nutmeg: Just a sprinkle livens everything up. Go easy though; it can be strong.
- Herbs: If you’re feeling adventurous, try adding a hint of rosemary for an elegant touch. Crazy, huh? But it works beautifully with pears.
Flavor Enhancers
Consider things like lemon juice. Just a tablespoon brightens up everything, stopping your tart from being too sweet.
Smart Substitutions
Hey, life happens! Sometimes you realize you’re out of something, or maybe you’re whipping up a dessert for someone with dietary restrictions. Here’s where you can play MacGyver in the kitchen!
- No butter? Try coconut oil in the same ratio. Cool, right?
- Gluten-free? Substitute the flour with a blend that works for you. And your pear tart? Trust me, it’ll still be a showstopper!
Kitchen Equipment Essentials
You don’t need a million tools, just a few solid ones for baking.
- Tart pan: A 9-inch one works wonders. The removable bottom can save you from cake disasters!
- Mixing bowls: You need multiple sizes. Gotta keep those ingredients separate while you whip up your magical Williams pear dessert!
- Rolling pin: Simple yet effective. It helps in achieving that thin, buttery tart crust you've been dreaming of.
Preparation Tips
Here’s a little pro tip: chill your dough. This will ensure a crust that’s flaky and just right!
Getting Ready for Bake Time
Alright, are you feeling ready to dive into baking a pear tart in just one hour ? let me tell you, there's something utterly rewarding about pulling a freshly baked oven-baked pear dessert out of the oven.
The smell alone will have everyone flocking to your kitchen, and they'll ask, “what’s that amazing aroma?” you get to play it cool and say, “just a little something i whipped up!”
Remember, baking is all about making it your own. Each ingredient is a choice, so the next time you bake that quick pear tart recipe , grab those fresh fruits, roll up your sleeves, and let’s create some delicious memories together!
Ready? Let’s move on to the golden instructions for making that pear tart magic happen!
Mastering the Art of Professional Cooking: Steps to Create a Delightful Williams Pear Tart
When it comes to baking, have you ever wondered how professional chefs whip up those stunning pastries? well, let me tell you, it all starts with a few essential preparation steps.
Whether you’re planning to bake williams pear tart in 1 hour delightfully or just dabbling with a quick pear tart recipe , mastering these techniques can elevate your skills significantly!
Essential Preparation Steps
The first rule in a chef’s kitchen is mise en place . this fancy term simply means "everything in its place.
" before you embark on your tart-making journey, gather all your ingredients: flour, sugar, unsalted butter, and of course, those juicy williams pears.
Having everything ready to go not only saves time but also keeps your workspace organized. trust me, you don’t want to be rummaging through the pantry when your dough is already resting!
Now, about time management —it’s crucial! set a timer. for this tart, you’ll want to allocate 20 minutes for prep and 40 minutes for baking .
Make sure to get that oven preheated to 375° f ( 190° c) while you're prepping, so everything flows smoothly.
Organization strategies matter, too. label your bowls if you’re using different mixtures or ingredients, and keep tools easily accessible. a clutter-free workspace keeps your mind at ease, and helps you avoid accidents.
Remember, safety is key. keep those kitchen disasters at bay by handling sharp knives carefully and keeping your surfaces clean to prevent slips.
Step-by-Step Process
Alright, let’s dive into the juicy details with some clear, numbered instructions :
- Prepare the Dough : Combine 1 ½ cups of all-purpose flour and ¼ cup sugar . Cut in ½ cup chilled butter until you're left with small crumbs. Add in the egg yolk and just enough cold water (about 2-3 tablespoons) until it comes together. Wrap it up and chill for 10 minutes.
- Preheat the Oven : As mentioned, crank it up to 375° F ( 190° C) .
- Toss the Pears : You’ll want to mix 4 sliced Williams pears with a little lemon juice, sugar, vanilla extract, and cinnamon . Let those flavors mingle!
- Roll Out the Dough : Roll the dough to fit your 9-inch tart pan . Don’t forget to trim the edges!
- Layer and Bake : Pour those lovely pears into the crust, and bake for 30- 35 minutes until the crust is golden brown. Check for doneness when the edges are crisp.
Expert Techniques
Listen, it’s one thing to follow a recipe and another to bring your own flair to it. professional chefs use critical steps like layering the fruit beautifully—so don’t just dump those pears in randomly! try spiraling them for a stunning look.
And here’s a little troubleshooting tip : If your crust begins browning too quickly, don’t hesitate to cover it with foil. Just a little hack that can save your hard work!
Success Strategies
Now, i’ve totally been where you are—a baking boo-boo can happen to anyone! so, what are some common mistakes to avoid ? well, one biggie is overworking the dough.
Be gentle! a flaky, tender crust is exactly what we want here.
For quality assurance , give your tart a quick taste as you go. is there enough cinnamon? a touch more sugar? this will help you achieve those perfect results.
Also, if you’re looking for a make-ahead option, the tart can be prepped a few hours in advance—just toss it in the fridge until you’re ready to bake.
Wrapping It Up
I can’t stress enough how lovely this williams pear dessert can be, especially when served with a dollop of whipped cream.
It’s an elegant addition to any holiday spread or a delightful way to close a dinner date. plus, you’ll find that it really is one of those easy tart recipes that feels gourmet without all the fuss.
So whether you make this as a comforting dessert to bake on a rainy day or as a treat to impress at gatherings, just remember to have fun! and hey, if you’re curious for more tips or variations, stay tuned for the additional information coming right up.
Happy baking, friends!
Pro Tips & Secrets for Your Williams Pear Tart
Oh my gosh, let me tell you, baking is like a little bit of magic! your williams pear dessert is about to become the centerpiece of your kitchen.
Here are a few pro tips straight from my kitchen to yours.
First off, when you’re making the homemade tart crust, remember to chill your dough . seriously, it makes a world of difference! a cold dough means a flakier crust, and who doesn’t love that buttery goodness? a little tip from my experiences? keep the butter chilled.
I usually pop it in the freezer for a few minutes before using it. you want those little pieces of butter to stay intact so they create those flaky layers.
Trust me!
Next up, time-saving techniques. if you're crunched for time, you can make the crust ahead of time. just wrap it up and store it in the fridge for up to 2 days or freeze it for longer.
Thaw it overnight before using. and, when it comes to slicing those pears, it’s all about getting them thin but not too thin—like, potato chip thin! it helps them cook evenly.
For flavor enhancement, toss your pears with a splash of lemon juice . it not only keeps them from browning but complements the sweetness beautifully.
And speaking of flavors, sprinkle a bit of vanilla extract and cinnamon in there; oh man, it’ll elevate your quick pear tart recipe to a whole new stratosphere!
Perfect Presentation Make Your Tart Shine
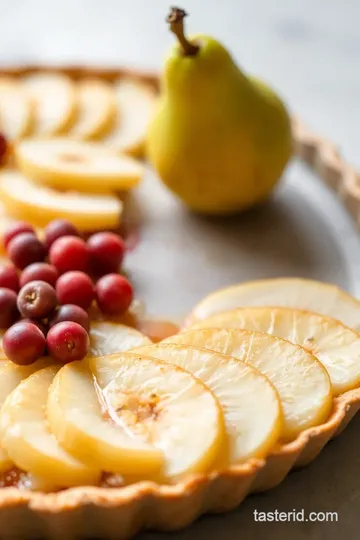
You want your tart to scream "eat me!" when it hits the table, right? let’s talk about those plating techniques .
I like to place the slices of pears in a fanned-out manner, almost like they’re in a cozy hug. it instantly makes your dessert look gourmet!
For garnish, a light dusting of powdered sugar right before serving can make it pop. a dollop of whipped cream on the side is a classic move, turning your oven-baked pear dessert into an instagram-worthy treat.
Pro tip: use a fresh mint leaf for a splash of color. it’s those simple touches that make all the difference!
Storage & Make-Ahead Tips
Now, if you’re like me, you sometimes have leftovers (hard to believe with this tart, but hey!). to keep your masterpiece fresh, store any remaining slices in an airtight container in the fridge.
It’ll stay fresh for about 3-4 days . i recommend enjoying it cold or reheating it at 350° f ( 175° c) for about 10 minutes to bring back that fresh-baked warmth.
Here’s a little secret: if you want to enjoy the tart longer? pop it in the freezer! it’ll last for up to a month.
Just make sure to wrap it tightly to prevent freezer burn. when you’re ready to indulge again? thaw it in the fridge overnight and then warm it up.
Easy peasy!
Creative Variations to Switch Things Up
Don't be afraid to play with flavors! shuffle those pears for apples or throw in some peaches for a seasonal twist—summer and fall fruits unite! and if you’re looking for a healthy dessert option , why not add a sprinkle of nuts on top? it brings a fun crunch and a different vibe to your tart.
For those with dietary needs, swap out the all-purpose flour with a gluten-free blend or make it dairy-free with margarine instead of butter.
During the holidays , you can infuse a bit of nutmeg for that seasonal feel.
Complete Nutrition Guide: Know What You're Eating
When you're enjoying your delightful williams pear tart , it’s nice to know what you’re savoring. each serving comes in at around 240 calories , packing in about 10g of fat and 36g of carbs.
Not the worst bomb of deliciousness, right? this dessert also gives you about 2g of fiber, helping you feel satisfied.
Think of it as a comforting dessert that’s layered with sweet and savory flavors; it’s indulgent but has a place in the world of easy fruit desserts .
Pair it with a fresh salad or some yogurt, and you’ve got a balanced treat!
Encouragement for You!
So, as you get ready to bake up your williams pear tart in 1 hour delightfully , remember this is about having fun in the kitchen.
Don’t sweat it if things aren’t perfect; some of my best baking triumphs came after a total mess! it's all part of the experience, and trust me, even if it doesn't turn out the way you imagined, it’ll still taste amazing! happy baking, friends! 🍐✨
Frequently Asked Questions
How do I ensure my tart crust is perfectly flaky when I bake the Williams Pear Tart in 1 Hour Delightfully?
To achieve a flaky tart crust, make sure to chill your butter and water before mixing. Additionally, avoid overworking the dough; just combine until the ingredients are moistened. After shaping the dough, chilling it for a short time helps maintain its texture while baking.
What is the best way to slice pears for the tart?
For the best presentation and texture, thinly slice the pears with a sharp paring knife, about 1/4 inch thick. This will ensure they cook evenly and fit nicely within the tart shell. A mandoline slicer can also help achieve uniform slices quickly.
Can I prepare the Williams Pear Tart in advance and store it for later?
Yes, you can prepare the tart in advance! Bake the tart and allow it to cool completely before covering it with plastic wrap. Store it in the refrigerator for up to 2 days. For the best flavor and texture, reheat it in the oven before serving.
What are some delicious variations for this Williams Pear Tart recipe?
You can enhance your tart by adding a layer of almond paste under the pears or experimenting with seasonal fruits like apples or peaches. For a spicier twist, consider adding a dash of nutmeg or ginger to the filling for a unique flavor profile.
Is there a healthier option to make the Williams Pear Tart?
To make a healthier version, consider using whole wheat flour instead of all-purpose flour for the crust. You can also reduce the sugar in the filling or substitute it with honey or maple syrup. Additionally, serving the tart with Greek yogurt instead of whipped cream can increase protein and reduce fat content.
What complimentary dishes or drinks would pair nicely with the tart?
This tart goes beautifully with a scoop of vanilla ice cream or crème fraîche. For beverages, a lightly spiced chai tea or a crisp glass of Pinot Grigio enhances the flavors wonderfully. A fresh arugula salad dressed with olive oil and balsamic vinegar also serves as a refreshing side.
Delightful Williams Pear Tart: Bake in 1 Hour Card

⚖️ Ingredients:
- 1 ½ cups all-purpose flour
- ½ cup unsalted butter, chilled and cubed
- ¼ cup granulated sugar
- 1 large egg yolk
- 2-3 tablespoons cold water
- 4 ripe Williams pears, peeled, cored, and thinly sliced
- ¼ cup granulated sugar
- 1 teaspoon vanilla extract
- 1 teaspoon ground cinnamon
- 1 tablespoon lemon juice
- 1 tablespoon cornstarch (optional)
- Powdered sugar for dusting
- Whipped cream or crème fraîche for serving
🥄 Instructions:
- Step 1: In a mixing bowl, combine flour and sugar.
- Step 2: Cut in chilled butter until mixture resembles coarse crumbs.
- Step 3: Add egg yolk and mix. Gradually add cold water until dough forms.
- Step 4: Shape dough into a disk, wrap in plastic wrap, and chill for 10 minutes.
- Step 5: Preheat the oven to 375°F (190°C).
- Step 6: In a separate bowl, toss sliced pears with lemon juice, sugar, vanilla extract, cinnamon, and cornstarch (if using).
- Step 7: On a floured surface, roll out the chilled dough to fit the tart pan.
- Step 8: Carefully transfer the dough to the tart pan and trim any excess.
- Step 9: Layer the pear mixture evenly over the tart base.
- Step 10: Place the tart in the preheated oven and bake for 30-35 minutes, until the pears are tender and the crust is golden.
- Step 11: Let the tart cool for a few minutes before removing it from the pan.
- Step 12: Dust with powdered sugar before serving with whipped cream or crème fraîche.
Previous Recipe: Easy Chocolate Xmas Balls for Festive Treats: A Simple Holiday Delight!
Next Recipe: Easy & Flavorful Mixing Delicious Trio of Dips in 20 Min: Perfect for Any Gathering!