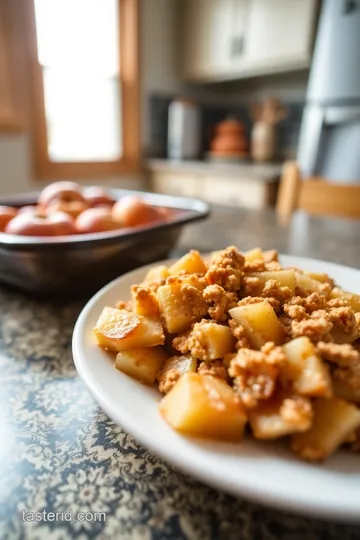
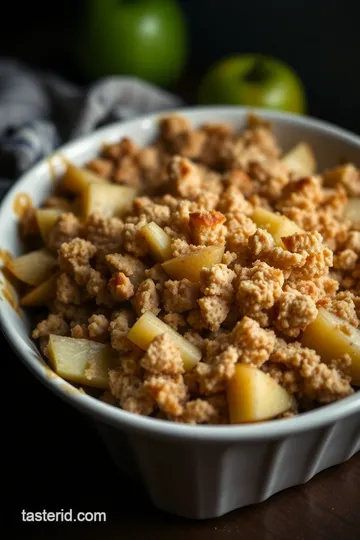
Classic Cinnamon-Maple Apple Crisp
Craving a warm dessert? My family loves this taste of home apple crisp, filled with sweet cinnamon apples and a crunchy topping. Perfect for cozy nights!

Sweet Memories: The Comfort of Taste of Home Apple Crisp
Oh my gosh! do you remember those chilly fall evenings when the air is crisp, and all you crave is something warm and sugary? i’ll tell ya, nothing beats the homey goodness of a taste of home apple crisp .
I once had a friend, karen—her grandma made the best apple crisp ever. it was like the whole kitchen transformed into a cozy paradise.
The sweet scent of baking apples and cinnamon would waft through the house, wrapping us in a blanket of nostalgia.
That’s the kind of comforting vibe i aim for with this recipe!
What’s in a Crisp? A Little Apple History
Now, let’s dive into a bit of history, shall we? apple crisp has been a beloved dish since the early 1900s here in america.
It’s said to have roots in the british crumble, but it has taken on a life of its own. in today’s world, this homemade apple crisp has found its place not just on tables during thanksgiving but also as an everyday comfort food.
Seriously, there's nothing like a warm apple dessert to lift your spirits after a long day.
This classic cinnamon-maple apple crisp is super easy—like, even a beginner can nail it! you’ll need about 15 minutes for prep and around 35- 40 minutes to bake.
And let’s be real: it’s not just for special occasions. make it anytime you want a quick apple dessert to brighten your day! plus, it’s kind on the wallet, so it won’t break the bank.
Why You’ll Love This Recipe
Let’s talk about the sweet benefits , shall we? first off, this apple crisp is more than just delicious. it’s packed with nutrients! those apples are loaded with fiber, and when you use maple syrup instead of refined sugar, you're getting a bit of that natural sweetness without all the guilt.
Not to mention, you can whip up a healthy apple crisp by using a gluten-free flour blend or even substituting with almond flour!
This easy apple dessert has all the cozy feels—perfect for family gatherings, movie nights, or even solo snacking. and let’s not forget about how it pairs beautifully with a scoop of vanilla ice cream .
That warm and cold combo? absolute heaven! whether you’re celebrating a special occasion or just chilling out on the couch, this crisp is a winner.
If you’re like me and love variations, you’ll be happy to know there are tons of ways to jazz it up.
Want to go nutty? throw in some chopped walnuts. craving a fruity twist? add in some berries! you can really customize it to match your mood or the season.
So, if you’re ready to create your own cozy memories, let’s dive into the ingredients you’ll need for this oven-baked apple dessert .
Get ready to impress your taste buds and bring a little warmth to your kitchen!

Essential Ingredients Guide
When it comes to cooking, the essentials really make the dish shine. think of it this way: you wouldn’t show up to a party without a killer playlist, right? well, your recipe deserves the same love.
From the premium core components to smart substitutions, i’m sharing everything you need to know for those cozy nights in, especially when whipping up a classic like taste of home apple crisp .
Premium Core Components
Let’s dive into the star players in your kitchen. first off, every cook needs to know measurements —both in us and metric.
Because when it’s time to sprinkle in that cinnamon or toss in some sugar, precision can be the game changer.
Now, how do you know if your ingredients are top-notch? look for quality indicators ! fresh herbs should be vibrant, and apples like granny smith or honeycrisp should feel firm in your hands.
If they’re looking wrinkly or soft? nah, leave those at the store.
When it comes to storage guidelines , make sure you’re properly sealing things up. an airtight container is your best friend for dry ingredients, while fresh produce prefers a breathable bag in the fridge.
And honestly, check that shelf life ! just because that jar of spices has been hanging around since the last decade doesn’t mean it’ll do your dish any favors.
Signature Seasoning Blend
Now, let’s talk seasoning . if you wanna step up your game, it’s all about those essential spice combinations. a little bit of cinnamon does wonders with apples—trust me on this one.
When you’re crafting that easy apple dessert , consider pairing herbs like thyme or rosemary for a unique twist. spice up your standard mix with some strong flavor enhancers like vanilla or nutmeg, and let’s be real, you might never look back.
Ever think about regional variations ? take those spices to the next level and consider what other cultures do with their apples.
You could swap in some curry powder for a flavorful kick or even a dash of ginger for some warmth—this will elevate your recipe to a whole new level!
Smart Substitutions
Sometimes, things don’t go according to plan. maybe you’re out of an ingredient, or you’re accommodating a dietary restriction . no sweat! knowing common alternatives can be a lifesaver.
Don’t have flour? try almond or coconut flour to keep it gluten-free.
What about those emergency replacements ? If you’re missing maple syrup , honey will do just fine, and if you’re running low on sugar, applesauce can take over without missing a beat.
And let’s not forget the seasons. every fall, you find this abundance of apples at the farmer's market. incorporate those seasonal options into your baking when they’re fresh and bursting with flavor.
Trust me; your friends will rave about your warm apple dessert, especially if you serve it with ice cream!
Kitchen Equipment Essentials
Alright, let’s get you set up. to create the best baked apple desserts , you don’t need a fancy kitchen gadget.
A mixing bowl, a pairing knife, and a baking dish are must-haves.
If you’re in a pinch, you can always improvise. don’t have a pastry cutter? forks or your fingers can do the trick for that crispy topping! my grandma always said, “when life gives you limited kitchen tools, make it work.
”
And for preparation tips , always read through the recipe first. Getting your apples ready while the oven preheats cuts down on wait time.
Don’t overlook storage solutions ! after devouring a delicious apple crisp, store leftovers in a tightly sealed container for up to three days.
Reheat it in the oven to keep that delicious crunch.
So, as we wrap this up, now you’re ready to create some magic in the kitchen! with the right ingredients and tips at your fingertips, your classic apple crisp recipe is about to become the star of your fall dessert lineup.
Let’s dive into the fun part—the instructions! your taste buds are in for a treat!
Mastering Professional Cooking: A Guide to Success
Let’s talk about the professional cooking method . this isn’t just for chefs in fancy restaurants; it’s a handy way for all of us to elevate our home cooking game.
The key? getting organized, timing everything right, and knowing those little tricks that’ll make your food pop. so, grab your apron, and let’s dive into making this process as easy as pie—apple pie, in fact!
Essential Preparation Steps
Alright, first things first, let’s chat about mise en place . it’s a fancy french term that simply means “everything in its place.
” before you start cooking, get everything prepped. that means measuring out your ingredients, chopping your veggies, and having those pans ready.
Seriously, there’s nothing worse than searching for a spatula when your dish is sizzling away.
Now, let’s talk about time management . set a timer for different tasks. for example, when you’re baking your classic cinnamon-maple apple crisp for 35- 40 minutes , set a timer! this way, you won’t forget about it while you’re watching the latest episode of your favorite show.
Remember, time is key in cooking, just like it is in life.
Being organized also extends to cleanliness. keep your workspace tidy; wipe spills as they happen. not only does it help you see what you’ve got going on, but it’s also safer.
We don’t want any slips or cuts while we’re jamming out to our favorite tunes in the kitchen!
Step-by-Step Process
Okay, you’ve got your game plan ready. It’s time to roll. Here’s a simple, clear process to follow when cooking:
-
Preheat your oven to 350° F ( 175° C). It’s crucial to have that oven nice and hot when it’s time to put in your apple crisp.
-
Prepare your ingredients. Mix those peeled and sliced apples with sugar, lemon juice, and cinnamon.
-
Make that topping by mixing flour, oats, brown sugar, and melted butter. Look for a nice crumbly texture, and remember, the golden rule is to stay patient!
-
Assemble it all. Layer your apples and topping in a baking dish.
-
Bake. Keep an eye on it! Those 35- 40 minutes will go fast. Look for that golden brown color and bubbling apples.
-
Cool and serve. This part is important. Allow your crisp to cool for at least 10 minutes . It sets everything just right.
Expert Techniques
Getting the hang of cooking is great, but let’s talk about some expert techniques . for starters, always taste your dish as you go.
You might find you want a little more cinnamon in that apple crisp. remember to check for those quality checkpoints —is it bubbling? is that topping golden and delicious?
If things go haywire, don’t panic. if your apple filling looks too runny, a sprinkle of cornstarch can save the day.
Cooking is all about adjustments, and trust me, we’ve all had those moments where things didn’t go as planned.
Success Strategies
Now, let’s be real. everyone makes mistakes in the kitchen—like forgetting the baking powder. oops! so here are some common mistakes to avoid when whipping up a delicious apple crisp or any fall dessert.
First, always peel your apples properly, making sure to cut out any bad spots. they affect the taste! and don’t be that chef who overloads the topping; a thin layer allows the flavors to shine through.
For quality assurance , always use the best apples for baking, like Granny Smith or Honeycrisp. They hold up so well and add that perfect balance between sweet and tart.
And for those nights when you’re in a pinch, feel free to make it ahead of time. you can prep your homemade apple crisp earlier, refrigerate it, and just pop it in the oven when you’re ready to wow your guests.
Now that we’ve got you all set to become a home cooking pro, it’s time to chat about some additional information .
We’re talking variations to keep your apple crisp game interesting, tips for those gluten-free options, and how to serve it up with a scoop of ice cream for that ultimate treat! trust me, nothing beats the taste of home apple crisp on a cozy night with loved ones.
Additional Recipe Information for Classic Cinnamon-Maple Apple Crisp
So, you’ve got your classic cinnamon-maple apple crisp all prepped and are ready to dive in! but wait! before you dig in, let me share some cool tips and tricks that will take this easy apple dessert to a whole new level.
From presentation to storage, i’ve got you covered like butter on warm toast. trust me; i learned a few things while experimenting with my recipes that i can't wait to share!
Pro Tips & Secrets
First up, time-saving techniques ! prepping your apples can be a drag, but here’s a little hack: use a paring knife and slice them thin.
This way, they cook faster and soak up that delicious cinnamon-maple flavor sooner.
Now, let’s talk flavor! for a sweet and savory touch, try drizzling a tad more maple syrup on the apples before adding the topping.
You won’t believe how much that sweetens the deal! and remember, a sprinkle of nutmeg isn’t required, but it makes the whole thing a cozy hug for your taste buds!
When it comes to presentation , here’s my personal touch: once it’s out of the oven, let it cool for a few minutes, then serve it in a rustic bowl.
The deep, inviting colors of the apples and the crunchy topping make for a beautiful contrast that’ll wow your guests!
Perfect Presentation
Plating your apple crisp well is like throwing a fancy dress party for dessert! serve it in a white bowl to really make those colors pop.
If you want to be extra, add a dollop of whipped cream or a scoop of vanilla ice cream on top.
You may want to include a drizzle of extra maple syrup—as if it needed any more sweetness!
Storage & Make-Ahead
Okay, so life happens—how do we store this goodness? if you have leftovers (or want to make it ahead of time), pop the crisp into an airtight container.
You can keep it in the fridge for about three days . to reheat, set your oven to 350° f ( 175° c) and heat for about 15– 20 minutes until it’s piping hot.
You could also freeze it! yeah, totally. just freeze it before baking, then cover it tightly. it’ll last for about two months .
When you're ready, bake from frozen, but give it a little more time in the oven. total game changer for busy weeks!
Creative Variations
I love to mix things up! you can adapt this apple crisp recipe to suit your tastes or to use what you've got on hand.
Want some berry bliss ? toss in some blueberries or raspberries for an explosion of flavor, especially in the summer.
Craving a nutty finish? Just pop some walnuts or pecans into your topping! For the gluten-free folks, swap out the all-purpose flour for a gluten-free blend—it works like a charm.
Complete Nutrition Guide
Now, let’s get down to the nitty-gritty —the nutrition . each serving has about 320 calories . that’s not terrible for a dessert that tastes like a hug in a bowl! it’s got some fiber from the oats and, let’s be real, apples are totally good for you.
But if you’re counting grams of sugar , remember you can always adjust how much you use. and hey, balancing this crisp with a fresh green salad makes it even more of a well-rounded meal.
You can call it “healthy comfort food” and i won’t tell anyone!
Expert FAQ Solutions
Got questions? i heard you, friend. a common oopsie is oversoftening the apples. just keep an eye on them as they bake.
If the topping turns too brown but you’re nervous the apples aren’t done, cover the top with foil to keep it from burning, and let the beauty keep cooking.
So, there you have it, my sweet-toothed pals! this taste of home apple crisp isn’t just a recipe; it’s a chance to create delicious memories with family and friends.
Whether you serve it warm with ice cream or as a cozy, baked treat to close a long day, you can’t go wrong.
Now, go ahead and impress your loved ones with this sweet masterpiece. 🍏✨
Classic Cinnamon-Maple Apple Crisp Card

⚖️ Ingredients:
- 6 cups peeled and sliced apples (such as Granny Smith or Honeycrisp)
- ½ cup granulated sugar
- 1 tablespoon lemon juice
- 1 teaspoon ground cinnamon
- ¼ teaspoon nutmeg (optional)
- 1 cup all-purpose flour
- 1 cup rolled oats
- ½ cup packed brown sugar
- ½ teaspoon salt
- ½ teaspoon ground cinnamon
- ½ cup unsalted butter, melted
- ¼ cup pure maple syrup
🥄 Instructions:
- Step 1: Preheat the Oven: Preheat to 350°F (175°C).
- Step 2: Prepare the Apple Filling: In a large mixing bowl, combine sliced apples, sugar, lemon juice, cinnamon, and nutmeg (if using). Toss until apples are evenly coated. Transfer apple mixture to the baking dish.
- Step 3: Make the Crisp Topping: In another bowl, combine flour, oats, brown sugar, salt, and cinnamon. Stir in melted butter and maple syrup until evenly mixed.
- Step 4: Assemble the Crisp: Evenly spread the topping over the apple filling in the baking dish.
- Step 5: Bake: Bake in preheated oven for 35-40 minutes, or until topping is golden brown and apples are bubbling.
- Step 6: Cool and Serve: Allow to cool for about 10 minutes before serving to allow the juices to set.
Previous Recipe: How to Make Skinny Taste Marry Me Chicken: A Delicious Delight
Next Recipe: How to Make Taste of Home Baked Spaghetti: A Delicious Family Classic