Classic Mint Ice Cream Cone with Chocolate Drizzle
Craving a cool treat? Discover my homemade mint ice cream cone topped with chocolate drizzle! It's a refreshing summer dessert you'll love!

Let's Chill and Scoop: The Mint Ice Cream Cone
You ever have one of those sweltering summer days where you just need a cold treat? well, let me tell you about a perfect little indulgence called the mint ice cream cone .
Picture this: i’m sitting on my porch, the sun beating down, and all i can think about is that cool, creamy mint goodness.
Honestly, is there anything better? this yummy combo of homemade ice cream in a crisp cone just hits the spot every time.
I mean, mint chocolate chip ice cream? yes, please!
A Little Ice Cream History
Ice cream's roots go way back. we’re talking ancient history! people have been enjoying frozen desserts in various forms for centuries.
But the mint flavor? that didn’t really become popular until the 20th century. these days, it’s everywhere—from gourmet ice cream cones to simple summer treats at your local scoop shop.
Making your own is so much more satisfying and believe me, those creamy mint desserts can elevate any occasion.
Now, let’s get real: making a mint ice cream cone from scratch isn’t the quickest endeavor. you’ll need about 20 minutes for active prep, but let’s be honest, the best things take a little time.
Expect about 4 to 5 hours altogether once you factor in chilling and freezing—the perfect excuse for some “me” time while you wait!
Budget-Friendly Y UM
Let’s talk money. making your own mint ice cream is often cheaper than buying those fancy store-bought pints, especially when you’re making enough to share! with just a few ingredients—heavy cream, fresh mint leaves, and sugar—this recipe yields about 4 delicious servings .
It’s a win-win for both your taste buds and your wallet!
Key Benefits of Mint Ice Cream
Why should you whip up this mint dessert recipe? first off, it’s got serious health perks. fresh mint is not just a flavor powerhouse; it’s also known for helping digestion.
And the heavy cream? well, it’s a lovely source of calcium. plus, how refreshing is it to indulge in a dessert that feels light yet satisfying?
This mint ice cream cone is a star when it comes to gatherings! birthdays, backyard barbecues, or just a random hot tuesday, it’s the kind of treat that’ll have friends and fam raving.
Want to make it even more fabulous? a drizzle of gourmet chocolate sauce for ice cream takes it to another level.
Plus, you can mix in some add-ins for extra crunch or flavor surprises.
When you think about frozen desserts, this one stands out. it’s way better than store-bought versions, trust me! homemade ice cream has a creamier texture and you control the sweetness and mintiness.
And with options like no-churn mint ice cream or even dairy-free options , everyone can join in on the fun!
Are you drooling yet? because i am! now that we’ve set the stage for this minty delight, let’s dive into what you’ll need to make these dreamy mint ice cream cones.
Grab your ingredients, and let’s get ready to make some magic happen in the kitchen!
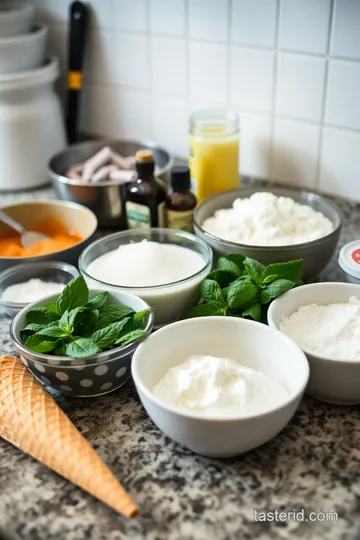
Essential Ingredients Guide to Crafting Mint Ice Cream Cones
If you’re ready to whip up some delicious homemade ice cream , particularly a classic mint ice cream cone , you're in for a treat! let’s dive into the essential ingredients that will make your summer (or honestly, any time) swoon-worthy with minty refreshment.
Premium Core Components
Mint Ice Cream Ingredients:
- 2 cups heavy whipping cream (480 ml)
- 1 cup whole milk (240 ml)
- 1 cup granulated sugar (200 g)
- 1 teaspoon pure vanilla extract (5 ml)
- 1 cup fresh mint leaves, tightly packed (about 40 g)
- 1/2 teaspoon salt (2 g)
- 1 tablespoon peppermint extract (15 ml)
For the chocolate drizzle , you'll need:
- 4 oz dark chocolate (113 g, chopped)
- 1 tablespoon coconut oil (15 ml)
And of course, you can't forget about your cone:
- 4 waffle cones
Now, when it comes to quality, you’ll want those fresh mint leaves to be vivid green and fragrant. if they look wilted, keep on searching! and remember, fresh mint packs a punch compared to dried mint , which is more muted in flavor.
As for storing your ingredients , keep your cream and milk in the coldest part of your fridge and your mint wrapped in a damp paper towel.
Signature Seasoning Blend
Herbs & flavor enhancers: fresh mint is the star here, but if you want to get wild with flavors, consider adding a pinch of sea salt to balance out the sweetness.
Chocolate lovers, don't forget to whip up a gourmet chocolate drizzle using that dark chocolate and coconut oil. it’s a game-changer for your mint ice cream sundae !
Smart Substitutions
Hey, life happens, right? If you're in a pinch for some ingredients, worry not! Here are a few quick swaps:
- No fresh mint? Swap in 1-2 teaspoons of mint extract.
- Dairy-free friends, rejoice! Use coconut cream and almond milk instead of heavy cream and whole milk.
- Need a quick fix? Use any leftover chocolate sauce or melted dark chocolate instead of dripping your own.
Kitchen Equipment Essentials
Before you dive in, here’s a quick rundown of must-have tools:
- Ice cream maker (this is for the creamy mint desserts magic)
- Medium saucepan and whisk to combine your minty base
- Fine mesh strainer to get rid of those pesky mint leaves
- Mixing bowl for your ingredients!
- Microwave-safe bowl for your chocolate saucy goodness
Let’s not forget about those gourmet ice cream cones. You can totally use store-bought, but hey—making your own waffle cones can be a fun weekend project!
Tips for a Minty Fresh Success
Here are a few nuggets of wisdom I’ve gathered from my own kitchen adventures:
- Chill your ice cream mix! After you’ve infused that mint, refrigerate for at least four hours. This will ensure a super creamy texture when you churn.
- Consider adding cool mint ice cream toppings , like crushed Oreos or chocolate chips for some texture!
- If you’re feeling adventurous, switch things up! Blend in crushed peppermint candies for a refreshing twist.
Now, who wouldn't want to make a mint chocolate swirl or a refreshing scoop in a homemade cone? honestly, it’s one of those summer treats that brings us all together.
Perfect for backyard barbecues, ice cream parties, and those special children's parties.
Are you ready to make your famous mint ice cream variations ? all that’s left is to follow the simple steps to put this together.
Trust me, you will want this mint ice cream cone on your menu this summer. time to get churning!
Professional Cooking Method: Crafting a Mint Ice Cream Cone
Ah, summer! the sun shines brighter, the days stretch longer, and cravings for a mint ice cream cone hit harder.
But hey, making ice cream from scratch? it’s easier than you think and totally worth the effort! trust me, once you taste your own homemade mint chocolate chip ice cream , there’s no going back.
Let’s dive into the nitty-gritty with some professional cooking methods that’ll help you whip up this creamy delight. so, grab your apron and let’s go!
Essential Preparation Steps
First off, let’s talk mise en place . sounds fancy, huh? all it means is having everything set and ready to roll.
Get your ingredients—heavy cream, whole milk, sugar, fresh mint, and chocolate—measured out before you start. this not only saves time but makes the process so much smoother.
No one wants to be scrambling for the sugar when you're in the thick of it!
Now, jump to time management . set a timer! seriously, this isn’t just to look cool in the kitchen. use it for the 30 minutes steeping time for your mint infusion and the 4 hours chilling time before churning.
Time flies, and a gentle reminder helps prevent those freak-out moments.
Organization is crucial, too. keep your workspace tidy; it helps clear your mind! make sure to have all tools at hand: a medium saucepan, whisk, ice cream maker, and fine mesh strainer.
And always remember safety considerations —if you're using a hot stove, wear an apron to protect yourself from splashes.
Step-by-Step Process
Now, let’s get into the nitty-gritty of making that ice cream! Here’s a clear path to that delicious treat:
-
Infuse the cream base. heat 2 cups of heavy cream, 1 cup of whole milk, and 1 cup of sugar in a saucepan over medium heat until the sugar dissolves.
Remove from heat , add 1 cup of fresh mint leaves , and cover. let it steep for 30 minutes .
This is when the magic starts.
-
Strain and add flavor. strain the mixture using a fine mesh strainer to ditch the mint leaves. stir in ½ teaspoon of salt, 1 teaspoon of vanilla extract, and 1 tablespoon of peppermint extract.
-
Chill Ice Cream Base. It’s time to chill out—literally! Pop that mixture in the fridge for at least 4 hours (or overnight).
-
Churn Ice Cream. Pour your chilled mix into the ice cream maker and churn for about 20 minutes . You’ll want it thick and creamy!
-
Freeze Ice Cream. Transfer your churned ice cream to a container and freeze until firm, which is about 2- 3 hours .
-
Prepare Chocolate Drizzle. For that luxurious chocolate topping, melt 4 oz of dark chocolate and 1 tablespoon of coconut oil in the microwave, stirring every 30 seconds until smooth.
-
Assemble. Scoop your mint ice cream into those delectable waffle cones, drizzle the chocolate over the top, and voilà! You’re ready to indulge.
Expert Techniques
Getting to the expert level isn’t as tough as it sounds. the key is to always monitor temperature and timing.
If the cream is too hot, it could curdle during your chilling time, and nobody wants that! also, use quality checkpoints ; taste your base before churning to see if it’s minty enough for your palate.
Should you run into trouble, like your ice cream being too icy, consider adding a splash more cream next time.
It’ll smooth that out like butter! and hey, this is where your honest self-assessment comes into play—don’t hesitate to adjust next time based on what you learned.
Success Strategies
Let’s wrap this up with some success strategies . First, avoid common mistakes—like using dried mint instead of fresh. Fresh mint adds that punch that can’t be beat!
For quality assurance, don’t rush the chilling time; you'll thank yourself later when your ice cream has that silky smooth texture.
Want to have a fun summer treat ready? make the base a day ahead. that means more time basking in the sun and enjoying your mint ice cream sundae instead of sweating in the kitchen!
Now that you're set with all the basics, you might be wondering, what’s next? Let’s transition to some additional information that’ll elevate your mint ice cream game even more!
Scoop Up the Flavor: Additional Recipe Information for the Mint Ice Cream Cone
Pro Tips & Secrets
Oh my gosh, making homemade mint ice cream is a joyous experience, especially when you “get” it right the first time! Here's how to nail it:
Infusion is key: make sure to infuse your cream base with those fresh mint leaves well. letting it sit for at least 30 minutes allows all the minty goodness to soak in.
Trust me, this is where the magic happens!
Store smart: want to enjoy your ice cream a little later? keep it in an airtight container and store it in the back of the freezer.
You also can chill your ice cream mix to speed up the freezing process, so it turns out the creamiest.
Flavor Boost: A splash of peppermint extract does wonders. Just like adding a secret ingredient to grandma’s famous recipe, it really enhances the mint flavor!
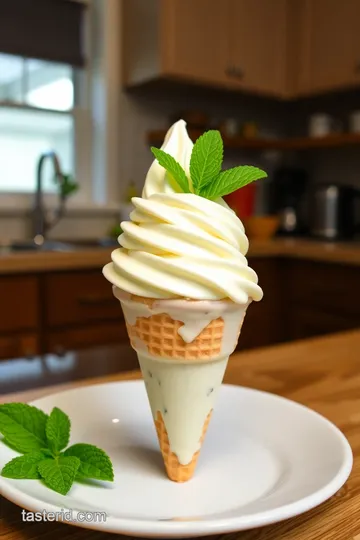
Perfect Presentation
Don’t just serve it; make it a treat to look at! Here are some dazzling ways to present your mint ice cream cone :
Plating Matters: Swirl that ice cream into a perfect dome and use a cookie scoop to get an evenly rounded scoop. It elevates the whole experience!
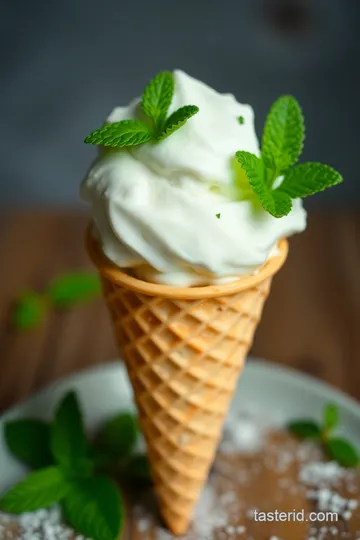
Garnish Galore: Top it off with more fresh mint leaves or even some mint chocolate chips for that extra ‘wow’ factor. You might even drizzle some gourmet chocolate over the top.
Color pop: we eat with our eyes first! a vibrant green mint ice cream against a crispy waffle cone is a beautiful sight.
Add splashes of fresh fruit or chocolate sauce for a color combination that’s instagram-worthy.
Storage & Make-Ahead
When the ice cream cravings hit, it’s good to know you’ve got a stash in the freezer.
Storage Guidelines: Your mint ice cream should last about 2 weeks in the freezer without losing its flavor. Just keep it covered to avoid ice crystals.
Preservation Tips: If your ice cream seems rock hard, don't panic! Let it sit on the counter for 5- 10 minutes before trying to scoop.
Reheating Chocolate Drizzle: If your chocolate drizzle hardens, just gently melt it in the microwave for a few seconds. Easy peasy!
Creative Variations
Ready to kick things up a notch? Here are some fun twists on the classic:
Mint-Chocolate Swirl: Mix in some homemade chocolate sauce for ice cream during the last few minutes of churning. It’s like a party in your mouth!
Seasonal Flavors: Try swapping in seasonal ingredients. When fall hits, why not add a touch of cinnamon? Mint ice cream with pumpkin spice might just become your new favorite!
Dairy-Free Delight: If you’re looking for dairy-free ice cream options , sub in coconut milk for the cream and almond milk for the whole milk. Perfect for those hot summer days!
Complete Nutrition Guide
Now, let’s sprinkle in some nutrition facts because knowing is half the battle!
This mint dessert recipe averages about 350 calories per serving. It gives you a splash of happiness with a generous helping of 4g of protein .
Note that while it’s a treat, the creamy nature means some fat— 22g —so enjoy it in moderation, right? Balance it out with a refreshing fruit or veggie on the side!
Expert FAQ Solutions
You might have a few burning questions, and I’ve got your back!
What if it doesn’t churn properly? if your ice cream maker recipes aren’t churning right, ensure your base is chilled enough before pouring it in.
A lukewarm mix leads to sad, soupy ice cream.
Can I make it without an ice cream maker? Absolutely! Try the no-churn mint ice cream option. Just blend the ingredients, pour it into a container, and freeze!
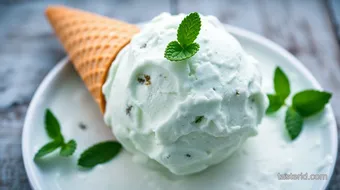
In Conclusion
Now that you have all the tips, tricks, and variations, you're ready to create your own classic mint ice cream cone masterpiece! whether you keep it classic or jazz it up, it’s bound to be a hit at any barbecue or children’s party.
Get creative and let your taste buds guide you to deliciousness. go ahead, and treat yourself to a scoop of this refreshing ice cream! can't wait to hear how yours turns out!
Classic Mint Ice Cream Cone with Chocolate Drizzle Card
⚖️ Ingredients:
- 2 cups heavy whipping cream (480 ml)
- 1 cup whole milk (240 ml)
- 1 cup granulated sugar (200 g)
- 1 teaspoon pure vanilla extract (5 ml)
- 1 cup fresh mint leaves (tightly packed; about 40 g)
- 1/2 teaspoon salt (2 g)
- 1 tablespoon peppermint extract (15 ml)
- 4 oz dark chocolate (113 g, chopped)
- 1 tablespoon coconut oil (15 ml)
- 4 waffle cones
🥄 Instructions:
- Step 1: Combine heavy cream, whole milk, and sugar in a medium saucepan. Heat over medium heat until sugar dissolves, whisking constantly.
- Step 2: Remove from heat, add fresh mint leaves, and cover. Let steep for 30 minutes.
- Step 3: Strain the mint-infused cream mixture through a fine mesh strainer to remove leaves.
- Step 4: Stir in salt, vanilla extract, and peppermint extract.
- Step 5: Refrigerate the strained mixture for at least 4 hours or overnight until completely chilled.
- Step 6: Pour chilled mixture into an ice cream maker and churn according to manufacturers instructions until thick and creamy (about 20 minutes).
- Step 7: Transfer ice cream to a container and freeze until firm (at least 2-3 hours).
- Step 8: Melt dark chocolate and coconut oil in a microwave-safe bowl, stirring every 30 seconds until smooth.
- Step 9: Scoop mint ice cream into waffle cones. Drizzle melted chocolate over the top of each cone and serve immediately.
Previous Recipe: How to Make My Grandmother's Soft Taste Doughnuts: A Delicious Journey!
Next Recipe: My Grandmother's Easy Gingerbread Slice: Best Holiday Dessert!