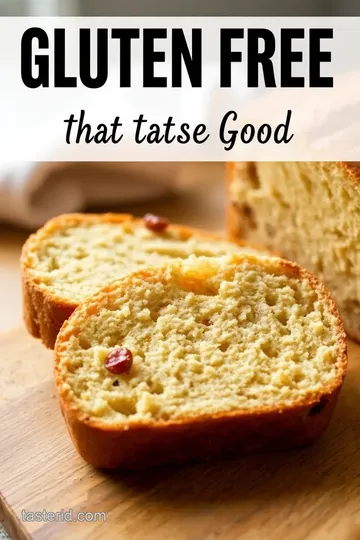
Delicious Gluten-Free Bread
Looking for gluten free bread that tastes good? Discover 7 mouthwatering recipes that make gluten-free baking a joy. Try them today!

- Have You Tried Baking Bread That’s Gluten-Free and Actually Tastes Good?
- A Taste of History
- Your New Favorite Delicious Gluten-Free Bread
- Health and Nutrition Highlights
- Quality Ingredients Breakdown
- Kitchen Equipment Essentials
- Perfect Cooking Technique
- Master Chef's Advice
- Perfect Presentation
- Storage and Make-Ahead
- Creative Variations
- Complete Nutrition Guide
- Expert FAQ Solutions
- Recipe Card
Have You Tried Baking Bread That’s Gluten-Free and Actually Tastes Good?
Let me ask you something: what’s the one smell that makes your heart skip a beat? for me, it’s the lovely aroma of freshly baked bread wafting through the kitchen.
But here’s the kicker: have you ever tried finding a gluten-free bread that doesn’t taste like a gym shoe? it’s quite the quest, isn’t it? if your eyes just widened with a sense of hope, you’re in for a treat because today, we’re diving into a recipe for delicious gluten-free bread that will swaddle your taste buds in pure joy.
This recipe is special because it takes just an hour from mixing the ingredients to pulling the first warm loaf out of the oven.
And don’t worry if you’re not a seasoned baker; this is easy peasy! you don’t need a phd in culinary arts to get this right.
It’s a simple, foolproof recipe that guarantees delicious results every single time. seriously, your friends might just think you’ve become some sort of artisan baker overnight.
A Taste of History
Baking bread has been a part of human culture for thousands of years, dating back to the ancient egyptians who created some of the first leavened bread.
Fast forward to today, and gluten-free baking has emerged as a beacon of hope for those with gluten sensitivities or celiac disease.
The beauty of this bread lies not just in its roots, but also in its modern adaptations that cater to present-day preferences—all while harkening back to those age-old traditions.
What makes gluten-free bread so appealing today? well, the rise of health-conscious dining has brought focus to gluten-free recipes, and among them, our homemade loaf stands tall.
Imagine offering warm slices to friends and family, displaying something that fits their dietary needs without compromising on flavor.
Your New Favorite Delicious Gluten-Free Bread
This bread reflects a rich culinary heritage mixed with contemporary flavors. it hails from countless adaptations made over the years, gaining immense popularity with those looking for gluten-free bread alternatives.
The warm, earthy notes of almond flour blend perfectly with the nutty flavor of flaxseed, crafting a loaf that’s as comforting as it is healthy.
But let’s get down to what really matters: it’s delicious! it’s got this lovely balance of flavors, and trust me, it’s going to become an instant favorite in your household.
I mean, who wouldn’t want a gluten-free bread that tastes good and makes you wonder why you ever settled for anything less?
Unique Flavor Combinations and Techniques
Now, if you think making gluten-free bread is some daunting task, allow me to put your mind at ease. the recipe utilizes simple yet effective techniques that rhyme well with the needs of gluten-free baking.
The combination of dry and wet ingredients is not expert-level; it’s akin to mixing a good ol' cup of tea! plus, with my expert-tested method, you won’t have to worry about baking failures.
I’ve definitely had my share of dense bricks that were supposed to be bread, so i can guide you through avoiding those pitfalls!
Time-saving tips? oh, they’re coming your way! we skip the complicated steps and focus on whipping up this loaf in a jiffy—ideal for busy days when you just want to munch on something homemade.
Health and Nutrition Highlights
Now, let’s talk health because, let’s face it, nobody wants their loaf of bread filled with empty calories. this gluten-free bread is not just friendly to your tummy; it offers some impressive nutritional benefits.
Packed with fiber-rich gluten-free flours, it provides a wholesome source of energy without the gluten fallout.
If you’re watching your diet, you'll be pleased to know that this recipe is also nut-free, vegan (if you opt for flax eggs), and keto-friendly if you choose to adjust the sweeteners.
Each slice is a harmonious balance of health and flavor—perfect for those gluten-free meal ideas you’ve been hunting for!
Recipe at a Glance
Let’s round things off with a quick look at the specifics:
- Preparation Time: 15 minutes
- Cooking Time: 45 minutes
- Total Time: 1 hour
- Serving Size: About 10 slices
For those of us keeping that grocery bill in check, this recipe is also cost-efficient. Yes, you can enjoy some terrific bread without emptying your wallet!
Now that you’re all prepped up and excited about diving into this delicious world of gluten-free baking, let’s move on to the ingredients you’ll need.
It’s time to gather your supplies and prepare to bake a loaf that will have everyone asking for your secret recipe!
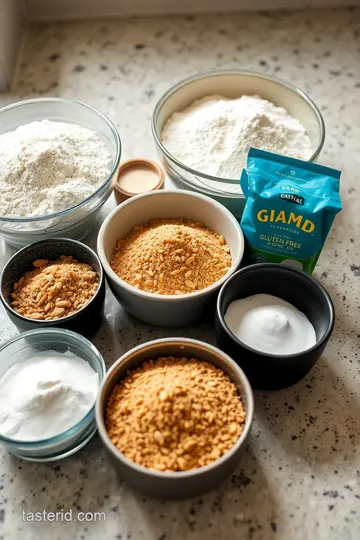
Quality Ingredients Breakdown
Making a Delicious Gluten-Free Bread starts with quality ingredients. Trust me, you’ll love the flavors and textures when you choose the best. Let's break it down!
Premium Core Ingredients
-
Gluten-free all-purpose flour – 2 cups : ensure your flour has xanthan gum or add about 1 teaspoon separately. trust me, that's the glue that holds everything together, almost like a reliable friend! when choosing, look for a blend that's finely milled and free of gritty bits.
Store it in an airtight container in a cool, dark place to keep it fresh.
-
Almond flour – 1/2 cup : this adds a lovely, nutty flavor and moisture to your bread. opt for finely ground almond flour since coarse bits can lead to an uneven texture.
I’ve learned the hard way to keep it sealed tightly in the fridge—it can go rancid pretty quickly!
-
Ground flaxseed – 1/4 cup : this brings both nutrition and a bit of binding action. when mixed with water, it helps the bread hold together without gluten.
Buy it whole and grind it fresh for the best flavor. store it in the fridge for extra freshness.
-
Coconut sugar – 2 tablespoons : adds a warm sweetness and is a great alternative to regular sugar. look for the kind that’s granulated, which gives your bread that lovely caramel flavor without the refined feel.
Keep it in a dry place to avoid clumping.
-
Baking powder – 2 teaspoons : a key leavening agent—don’t skip this! use a fresh, unopened can. storing it in a cool cupboard ensures it’ll be ready to give your bread a nice rise.
-
Salt – 1/2 teaspoon : Just a pinch, really, but it enhances every flavor. Use good quality sea salt; it’s got a cleaner, brighter taste than regular table salt.
Signature Seasoning Blend
Now, while this bread is delicious plain, don’t shy away from getting a lil' fancy with those flavors!
-
Spices : A pinch of garlic powder or even a hint of smoked paprika packs a powerful punch. If you’re feeling adventurous, toss in some zaatar for a Middle Eastern flair.
-
Herbs : Think fresh rosemary or thyme. Just chop them finely and mix them in. Dried herbs can also work, but they have a more subdued flavor.
-
Flavor Enhancers : A splash of apple cider vinegar adds a bit of brightness. It’s like the secret handshake of gluten-free baking that makes your bread sing!
-
Aromatic Additions : Consider adding a couple of drops of vanilla extract to elevate your sweet combos—only for breakfast or dessert breads, of course.
Smart Substitutions
Sometimes, life throws a curveball. If you’re out of something, no problem!
-
Gluten-Free Flour Alternatives : If you're in a pinch, you can substitute with oat flour or even chickpea flour. Just be mindful—different flours might change the texture a tad.
-
Dietary Swaps : For a nut-free version, try using sunflower seed flour instead of almond flour.
-
Emergency Replacements : No eggs? Mix 1 tablespoon of ground flaxseed with 2.5 tablespoons of water for each egg you’d typically use.
-
Seasonal Variations : Add zucchini or pumpkin puree in place of some of the wet ingredients for a seasonal twist. Just make sure you adjust your flour quantities as needed!
Kitchen Equipment Essentials
Having the right tools makes all the difference!
-
Must-Have Tools : A good mixing bowl and a whisk; these can work wonders! A sturdy spatula for mixing is essential too.
-
Recommended Appliances : Your oven is a no-brainer, but if you’ve got a stand mixer, oh boy, use it! It’ll make the mixing process so much easier.
-
Helpful Gadgets : A kitchen scale can be incredibly useful for precise measurements, especially with gluten-free flours.
-
Home Alternatives : No loaf pan? Grab any oven-safe dish; just adjust the baking time accordingly. Sometimes, I've used a round cake pan when in a hurry, and it worked out fine!
Pro Ingredient Tips
-
Selection Secrets : Shop at health food stores for fresher options. Look for certification labels, too—this reassures you about the flour’s gluten-free status.
-
Quality Markers : Always check for a good aroma when you open a package; stale is not what we’re after!
-
Storage Solutions : Airtight is the name of the game. Flours can absorb moisture and odors, which this bread doesn’t need.
-
Money-Saving Tips : Buy in bulk! It’s often cheaper and you’ll have stock ready for your next gluten-free baking project.
Now that we've grounded ourselves in the best ingredients, it's time to roll up those sleeves and get baking! The following section will walk you through the steps to whip up this scrumptious, gluten-free delight from scratch! Get ready to savor each slice of the bread that not only promises to be easy to make but will also leave you marveling—wow, this is gluten free bread that tastes good !
Perfect Cooking Technique
When it comes to baking bread, especially gluten-free bread, it often feels like a science experiment gone wrong! trust me, i’ve had my fair share of loaves that looked like bricks or were dry as the sahara.
But with a bit of love, patience, and the right techniques, you can whip up some truly delicious gluten-free bread that tastes good .
Let’s dive into how to make this happen!
Essential Preparation Steps
First off, let’s talk mise en place . This fancy term just means having all your ingredients prepped and at arm’s reach. For this gluten-free bread, you’ll need:
- Dry Ingredients: Gluten-free all-purpose flour, almond flour, ground flaxseed, coconut sugar, baking powder, and salt.
- Wet Ingredients: Warm water, olive oil (or melted coconut oil), apple cider vinegar, and eggs.
Make sure your flours are fresh—nobody wants stale bread! I learned the hard way that using funky flour gives you funky bread.
Prep Techniques: I usually measure everything out beforehand. This not only saves time but also keeps you from realizing mid-mixing that you forgot to grab something important.
Time Management: Give yourself about 15 minutes for prep, and another 45 for baking, plus cooling time. It really helps to set a timer, especially if you get distracted…think Netflix binge!
Organization tips: clean as you go. i can’t stress this enough. it keeps the kitchen from looking like a flour bomb went off, and you'll thank yourself when it’s time to slice that golden loaf .
Professional Cooking Method
-
Preheat the oven : start by preheating your oven to 350°f (175°c). of course, if your oven decides to run hotter than a dragon’s breath, adjust accordingly.
A lot of bread disasters stem from toasty temperature problems.
-
Mix Dry Ingredients : In a large bowl, whisk together your dry ingredients. Make sure there are no lumps lurking around—it’s a gooey mess waiting to happen.
-
Prepare wet ingredients : in a separate bowl, combine the warm water (about 110°f/43°c to activate that yeast), olive oil, apple cider vinegar, and eggs.
Whisk until it’s frothy— that’s the good stuff right there!
-
Combine ingredients : add the wet ingredients to the dry ones and stir like your life depends on it. you want a thick batter that can still be poured into your loaf pan.
Trust me, if it looks too runny, you're headed for more disappointment.
-
Pour into Loaf Pan : Transfer the batter to a greased or lined 9x5-inch loaf pan, smoothing the top. Get creative and top with seeds if you're feeling adventurous.
-
Bake : toss your loaf in the oven for 40-45 minutes. you’ll know it’s done when it’s golden brown and a toothpick comes out clean.
The aroma wafting through your house will be enough to have you dancing in the kitchen!
-
Cool : let it cool in the pan for about 10 minutes before moving it to a wire rack. if you slice too soon, you’ll ruin the texture.
Patience is in fact a virtue here.
Expert Techniques
A few pro tips that I’ve learned through trial and error:
-
Humidity and Baking : Gluten-free bread can be sensitive to humidity. A crowd of overly moist air can throw things off. If you live in a rainy area, reduce the water slightly.
-
Critical Steps : Make sure your eggs are room temp for a better batter blend. Room temperature ingredients mix effortlessly, and you'll get a light, airy loaf.
-
Success indicators : if the bread springs back when you gently press it, it's a sign you’ve achieved bread magic .
The sound of a hollow thump when tapped on the bottom is like the bread’s way of high-fiving you!
Success Strategies
Okay, let’s lay down some quick troubleshooting tips:
- If your bread falls flat, you might have over-mixed. Gluten-free flour can be a bit fragile. Treat it gently.
- For crumbly bread, you might need just a touch more moisture next time. A bit of water or olive oil can work wonders.
- Quality assurance? Keep it in an airtight container for a longer lifespan; otherwise, it’ll go stale faster than you can say “toast.”
Additional Information Section
Navigating gluten-free baking can seem intimidating at first, but with practice, you'll feel right at home in the kitchen. you might even create your own variations! if you’re eager to explore some gluten-free alternatives or want ideas for what to pair this lovely loaf with, don’t worry—i’ll be sharing all that goodness in the next section.
Buckle up for even more tips and tricks, and let’s keep the baking magic rolling!
Master Chef's Advice
Ah, the wonders of baking gluten-free bread! over the years, i've dabbled in various bread recipes, and let me tell you, some of my attempts were downright.
.. well, less than stellar. but thanks to some valuable tips from culinary pros, i learned a thing or two. for instance, always make sure your gluten-free all-purpose flour contains xanthan gum.
It acts like glue, helping the bread hold together better. and don't forget to measure the flour correctly; too much can make your loaf dense, and nobody wants a brick for breakfast!
Another trick i picked up is the importance of letting your dough rest. give it time to hydrate fully, which can make a world of difference in texture.
By the way, a baking thermometer can be your best friend! knowing the exact temperature of your oven can help guarantee that your gluten-free bread comes out perfectly golden every time.
So, the next time you're in the kitchen, just remember: patience and proper technique really do pay off.
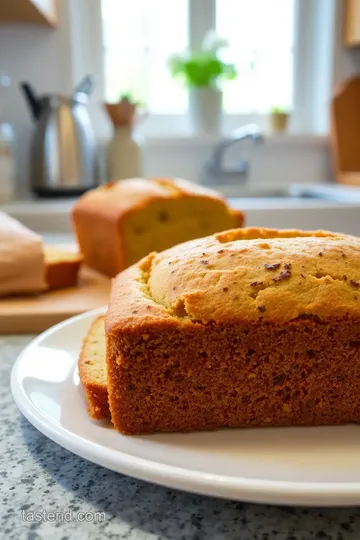
Perfect Presentation
Once you've mastered this gluten-free treasure, you’ll want to impress with its presentation. plating is an art, my friend! serve your homemade gluten-free loaf on a lovely wooden board, and maybe drizzle some olive oil on the side for a dash of elegance.
Garnishes can elevate your dish. fresh herbs scattered around or a sprinkle of sesame seeds on top of your bread before baking can add visual and flavorful interest.
Oh, and don’t underestimate the magic of a good slice! when serving, cut your bread with a serrated knife for the neatest edges.
Investing in a good bread knife is totally worth it—nothing's more frustrating than mangled slices!
Storage and Make-Ahead
Now, let's chat storage. i’ve had my fair share of stale bread, and it's not pretty. after baking, the key is to let your delicious gluten-free bread cool completely before you wrap it.
Store it in an airtight container at room temp for about three days—if you can resist, that is! if you bake a big batch, slice it up and pop it in the freezer.
It'll stay fresh for up to a month, and trust me, there’s nothing quite like toasting a slice of your homemade gluten-free loaf on a cozy morning.
When it comes to reheating, a quick toast in your trusty toaster or a couple of moments on a skillet can bring that warm, fresh-baked taste back.
Just keep an eye on it to avoid overdoing it, because burnt bread is a tragedy we all want to avoid.
Creative Variations
Let your creativity run wild! want a touch of sweetness? toss in a handful of dried fruits like cranberries or chopped dates.
You could also fold in some grated cheese for a cheesy goodness—perfect for those cozy evenings. seasonal variations can also make things interesting.
Toss in pumpkin puree in the fall or fresh herbs in the summer.
Diagramming gluten-free adaptations? you can use oat flour for a more fiber-rich bread or replace almond flour for a nut-free option.
The options are endless, and there’s something about experimenting with flavor that keeps me coming back to the kitchen.
Complete Nutrition Guide
Now, let's talk about why this is not just a treat for the tummy, but also for the soul! each slice gives you about 130 calories and decent protein punch, all while being gluten-free bread that tastes good! flaxseed provides a healthy dose of omega-3s, and using almond flour means you get some healthy fats too.
You’ll also score some fiber—about 2 grams per slice. in a world where everyone seems to be counting calories, it feels good to slice into something that’s a bit kinder to your waistline and your taste buds.
Expert FAQ Solutions
Got questions? i’ve been there too! common concerns are about the texture and rising. did my bread sink? yup! that happened in my early days.
Remember to let it rise enough—give it a good hour! and for those stubborn loaves that just won’t cooperate, try adjusting the moisture levels.
Sometimes a little water or a dash of vinegar can make all the difference.
If your bread comes out too crumbly, you might have skipped the xanthan gum or needed more liquid. Just keep a notebook of what works for you—no one ever said baking is easy, but it sure is rewarding!
In conclusion, baking homemade gluten-free bread is a delightful journey filled with triumphs and occasional bloopers. but with some simple tips and a sprinkle of creativity, you will create a loaf that dazzles both the eyes and the palate.
Whether it’s for breakfast, lunch, or a late-night snack, rest assured it’ll be a hit at your table. happy baking!
Delicious Gluten-Free Bread Card
⚖️ Ingredients:
- 2 cups gluten-free all-purpose flour (ensure it contains xanthan gum)
- 1/2 cup almond flour
- 1/4 cup ground flaxseed
- 2 tablespoons coconut sugar or brown sugar
- 2 teaspoons baking powder
- 1/2 teaspoon salt
- 1 cup warm water (about 110°F/43°C)
- 1/4 cup olive oil or melted coconut oil
- 1 tablespoon apple cider vinegar
- 2 large eggs (room temperature)
🥄 Instructions:
- Step 1: Preheat your oven to 350°F (175°C) and grease a 9x5-inch loaf pan with olive oil or line it with parchment paper for easy removal.
- Step 2: In a large mixing bowl, combine the gluten-free all-purpose flour, almond flour, ground flaxseed, coconut sugar, baking powder, and salt. Whisk well to ensure there are no lumps and the ingredients are fully blended.
- Step 3: In a separate bowl, combine the warm water, olive oil, apple cider vinegar, and eggs. Whisk until the mixture is well combined and slightly frothy.
- Step 4: Pour the wet mixture into the bowl with the dry ingredients. Stir vigorously using a spatula or wooden spoon until a smooth batter forms.
- Step 5: Transfer the batter into the prepared loaf pan and smooth the top with a spatula.
- Step 6: Place the loaf pan in the preheated oven. Bake for 40-45 minutes, or until the bread is golden brown on top and a toothpick inserted into the center comes out clean.
- Step 7: Once baked, remove the bread from the oven and let it cool in the pan for 10 minutes. Then, turn it out onto a wire rack to cool completely before slicing.
Previous Recipe: Avocado Salsa Taste Bitter? 6 Tips to Perfect the Flavor
Next Recipe: How Can I Make Protein Shakes Taste Better? 7 Delicious Tips