Delightfully Soft Taste Doughnuts
Wondering how to create fluffy taste doughnuts at home? Let me guide you through my cherished recipe, filled with nostalgia and sweetness—your family will love every bite!

- A Sweet Start: My Journey to Taste Doughnuts
- The Doughnut Chronicles: A Brief Overview
- Why You'll Love These Doughnuts
- The Sweet Adventure Continues
- Your Go-To Essential Ingredients Guide for Doughnut Magic
- Mastering the Art of Homemade Doughnuts
- Whip Up Delectable Doughnuts: A Complete Guide!
- Recipe Card
A Sweet Start: My Journey to Taste Doughnuts
Let me take you back to one of those sunday mornings when the entire house smelled like heaven. i was still half-asleep, wandering into the kitchen, drawn by that sweet, buttery aroma.
My mom was at it again, frying up a storm: her legendary homemade taste doughnuts . every time i sneak a bite, i’m transported back to my childhood, all gooey smiles and powdered sugar chaos.
And honestly? who can resist those fluffy doughnut bites?
So, let’s dive into this delightful recipe. if you've ever wanted to whip up some homemade doughnuts that are soft, warm, and downright delicious, you’ve landed in the right place.
Trust me, once you get the hang of it, you’ll never want to buy store-bought again.
The Doughnut Chronicles: A Brief Overview
The joy of doughnuts isn’t just a recent phenomenon. these fluffy wonders date back to the early 19th century, where recipes fluttered across continents, and before you know it, they became a classic breakfast treat in america.
Today? they’re still going strong and have transitioned into playful snack ideas for kids and adults alike. you can find endless doughnut styles and shapes at cafés and bakeries everywhere.
Now, let’s get real about the effort. this is a medium-level recipe, with about 20 minutes of active prep and a bit of resting time (yup, you’ll need to wait for that dough to rise).
After that? about 2- 3 minutes of frying per batch. not too shabby, right? and while a dozen of these gems might set you back a bit at a gourmet shop, making them at home is way more wallet-friendly.
Why You'll Love These Doughnuts
First of all, let’s talk health benefits. yes, i said it! doughnuts can be part of a balanced diet (in moderation, of course).
The use of nutmeg in baking adds a lovely flavor and has antioxidant properties. plus, with the option to control your ingredients, you can make them healthier without sacrificing that "wow" flavor.
And what’s cooler? these doughnuts are versatile! they shine bright during special occasions, from a cozy family brunch to kid-friendly birthdays.
Imagine a platter of these beauties, adorned with your choice of doughnut glaze variations and best doughnut toppings . it's sure to wow anyone!
Of course, there’s always the age-old debate: yeast doughnuts vs cake doughnuts . but these beauties? they strike the perfect balance between fluffy and indulgent.
Perfect texture is paramount, and with just a few frying tips and proper doughnut cutting techniques , you'll become a doughnut pro in no time!
The Sweet Adventure Continues
So, what do you need to make these indulgent dessert recipes ? gather your ingredients and gear up for some sweet baking action! get ready to explore the world of gluten-free doughnuts or even try your hand at seasonal doughnut recipes ; there’s an entire universe out there waiting for you.
Remember, the magic is in the doughnut preparation steps ! you’ll mix, knead, and fry your way to fluffy perfection.
Just steer clear of those common baking mistakes , and don’t forget to keep that oil at the right temp ( 350° f, if you’re wondering).
Are you ready to whip up these sweet breakfast recipes ? Because next, we’ll tackle the list of ingredients, and before you know it, your kitchen will be the best doughnut shop in town!
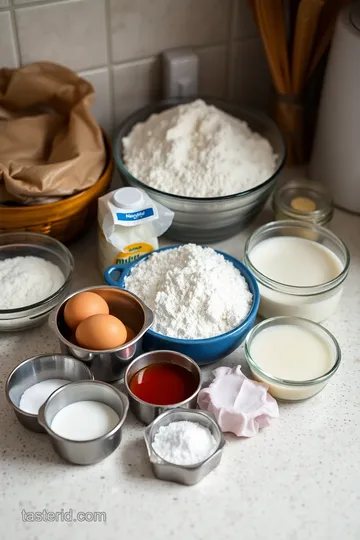
Your Go-To Essential Ingredients Guide for Doughnut Magic
Ah, doughnuts. what’s not to love? they’re the perfect blend of fluffy goodness and sweet indulgence. but before we dive into our delightfully soft taste doughnuts recipe, let’s talk about what you need to whip up these delightful treats.
It all starts with the essentials!
Premium Core Components: Building Blocks of Deliciousness
When you're making homemade doughnuts , you want to start strong with quality ingredients. Here are some key players:
- Flour : 2 ½ cups (312g) of all-purpose flour is your base. Look for a brand without any weird additives. For a gluten-free doughnut , try a 1:1 baking blend!
- Sugar : You'll need ½ cup (100g) of granulated sugar for sweetness. If you can, opt for organic; it just feels better, right?
- Baking Powder : Just 1 tablespoon is crucial for that perfect rise.
- Nutmeg : A little goes a long way! Grab ½ teaspoon ground nutmeg for that nostalgic kick.
- Milk : Whole or 2%— ½ cup (120ml) will do the trick. Make sure it’s fresh; you can’t go wrong with dairy!
- Butter : Melted unsalted goodness. 2 tablespoons (28g) to be precise. You could swap this for coconut oil if you're feeling adventurous!
- Eggs, Salt, and Vanilla Extract complete the combo. 1 teaspoon of pure vanilla extract? Yes, please!
Storage Tip : Freshness counts. Store your ingredients in a cool, dry place and always check expiration dates.
Signature Seasoning Blend: Sprucing It Up
What’s a doughnut without some flair? Here’s where you can get creative:
- Spice Combinations : Aside from nutmeg, a sprinkle of cinnamon can take these doughnuts up a notch! If you love a little warmth, get cozy with your spice rack.
- Herbs and Aromatics : Dill may not be the first thought, but a hint of rosemary can infuse a unique flavor. Don't shy away from experimenting with flavors!
Smart Substitutions: No Panic Zone
Ever stared into your pantry and thought, "Uh, I don't have that"? Been there:
- Common Alternatives : If you have cake flour , you can use it, but you'll get a denser doughnut! (Think of yeast doughnuts vs cake doughnuts .)
- Dietary Modifications : For vegan options, flax eggs can replace regular eggs. Just mix 1 tablespoon ground flaxseed with 2.5 tablespoons water and let it sit to thicken.
- Seasonal Options : Maybe it's fall? Try adding some pumpkin spice to the mix. Your senses will thank you!
Kitchen Equipment Essentials: Tools of the Trade
Ready to get cooking? Here’s your equipment checklist:
- Deep Fryer or Heavy Pot : You need it for frying! If you're using a pot, make sure it’s deep enough to avoid splatters.
- Thermometer : A candy thermometer is your best friend here. Aim for 350° F ( 175° C) . You want that perfect frying temperature. No one likes soggy doughnuts, am I right?
- Doughnut Cutter : Or, two round cutters will do in a pinch. Make your doughnut shapes fun!
Doughnut Preparation Steps: Let’s Get Cooking!
Now that you’ve gathered your essentials, you're not far from those blissful, fluffy doughnuts ! the steps are pretty straightforward.
Mix, knead, rest, fry—easy peasy! remember to cut those doughnuts out fast to keep the dough cool and manageable.
Take it from me; it’s all about the texture. you want that perfect doughnut texture —soft, airy, and just a tad crispy! if this is your first time, don't stress if a doughnut or two looks less than perfect.
Who's judging? those wonky ones usually taste the best anyway!
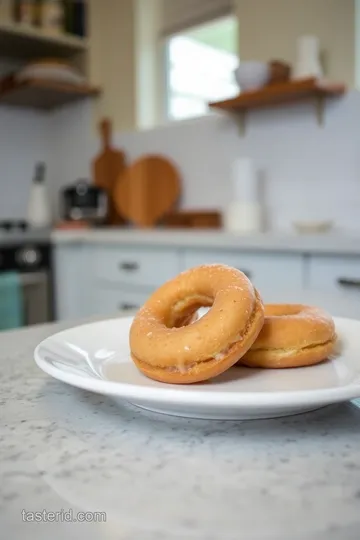
Ready for Sweet Indulgence?
Boom! you’re all set to create some epic doughnuts. these tasty rings of joy are sure to brighten up breakfast or any snack time, especially for the kiddos.
Keep those toppings in mind—from glaze variations to sprinkles galore!
So, grab your ingredients and get ready to taste the doughnuts of your dreams. Happy frying, and let’s dive into those step-by-step instructions next! Trust me, you’re gonna love this!
Mastering the Art of Homemade Doughnuts
Oh my gosh, have you ever tasted a really good doughnut? like, the kind that just melts in your mouth? well, let me take you on a little journey to create your own delightfully soft taste doughnuts right at home! these fluffy doughnuts are perfect for breakfast or as an indulgent snack, and once you get into the groove of it, you’ll be the doughnut whisperer of your neighborhood.
Essential Preparation Steps
Let’s kick it off with a little something called mise en place . sounds fancy, right? basically, just means getting all your ingredients and tools ready.
Measure out 2 ½ cups of all-purpose flour, get your ½ cup granulated sugar, and have your yeast prepped. trust me, having everything at your fingertips makes a world of difference.
Timing is everything! you want to prep the dough and let it rest for about 1 hour , so keep an eye on your clock.
It's like the dough’s beauty sleep. while that’s happening, tidy up your workspace. no one likes a messy kitchen – gets my brain all jumbled!
Safety first! when you get to frying, remember to heat that oil to 350° f . you don’t want to go higher; you’ll end up with burnt doughnuts, and that’s just tragic.
And let’s not even mention the smoke alarm going off when you’re just trying to whip up some sweet breakfast pastries!
Step-by-Step Process
Alright, let’s break this down into clear, friendly steps.
-
Prepare the dough: in a bowl, whisk together your dry ingredients: flour, sugar, baking powder, nutmeg (definitely don’t skip this guy – adds magic), and salt.
In a separate bowl, combine 2 large eggs , ½ cup milk , 2 tablespoons melted butter , and 1 teaspoon vanilla extract .
Mix those wet ingredients until they're all lovey-dovey. then combine the two bowls, stirring gently until just mixed.
-
Knead and rest: now, turn that dough onto a floured surface and knead it for about 2 minutes until it’s smooth.
Don’t overdo it; you want these doughnuts to stay soft and tender. wrap it up and let it chill for 1 hour .
-
Heat the Oil: In a deep pot, toss in 4 cups of vegetable oil and ramp up the heat. Keep checking with a thermometer until it reaches 350° F .
-
Cut Your Doughnuts: Roll your rested dough to ½ inch thick on a floured surface. Time to channel your inner artist – cut out the doughnut shapes!
-
Fry and shine: fry them in batches – around 2- 3 minutes on each side. use a slotted spoon to rescue those golden beauties and let them cool on a rack.
-
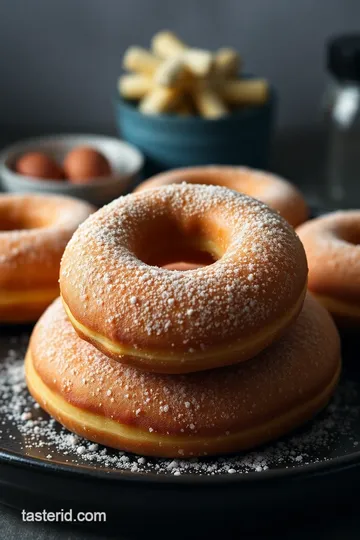
Glazing (Optional but Exciting): Mix powdered sugar, milk, and vanilla for a simple and heavenly glaze. While they’re warm, dip those doughnuts and watch the glaze drizzle off in all its sugary glory!
Expert Techniques
Want to nail that perfect doughnut texture? use these expert tips! always keep an eye on that oil temperature – too hot and you’re looking at crispy on the outside and doughy on the inside.
Aim for that 350° f sweet spot!
If your dough seems sticky, dust it with more flour but don't overwork it. you want your doughnuts to be fluffy, not dense little rocks.
And hey, if you want to veer off the classic doughnut recipe, why not try some glaze variations? whip together different flavorings like orange zest or even switch things up with nutmeg in baking for a cozy twist.
Success Strategies
Let’s chat about common mistakes! one biggie: cutting your dough too thick. aim for that perfect ½ inch thickness . and for the love of doughnuts, don’t skip the cooling rack.
This helps prevent soggy bottoms!
You can also make-ahead options; the dough can rest in the fridge overnight. just bring it back to room temp before frying.
And for those looking for gluten-free doughnuts, use a 1:1 gluten-free baking blend . trust me, your friends and family will never know the difference!
So, dust off your frying pans and dive into the delicious world of homemade doughnuts. there's nothing like the joy of pulling them out of the fryer and tasting that sweet, fluffy perfection.
Whether it's a classic glaze or a wild topping choice, you’re well on your way to being a doughnut aficionado!
Stay tuned for Additional Information where I’ll share more tips, tricks, and ideas to keep the magic alive in your kitchen. Happy cooking, friends!
Whip Up Delectable Doughnuts: A Complete Guide!
There’s something magical about homemade doughnuts, am i right? whenever i think of those fluffy doughnuts, my mouth waters! you know, just thinking of that warm, sweet flavor and the way they melt in your mouth.
If you’re in the mood to indulge, let’s dive into some pro tips and secrets , perfect presentation, and a few creative variations for those delightful treats!
Pro Tips & Secrets
First off, let’s talk about how to nail that fluffy doughnut texture . the trick is to keep your ingredients fresh.
Seriously, check those expiration dates, especially on the baking powder! and when you mix your dough, don’t overwork it . this helps in keeping those doughnuts soft and tender.
Now, let’s chat about time-saving techniques. if you're busy (and who isn't?), you can prepare the dough ahead of time! just wrap it up and stash it in the fridge.
When you're ready for a sweet treat, let it come to room temperature before frying. trust me, it's a game-changer!
Want to amp up the flavor? next time you bake, don’t skip the nutmeg ! just a pinch adds so much depth, it’s like a warm hug in baked goods.
And hey, if you want to elevate the taste even more, a splash of vanilla extract can work wonders. it really makes those doughnuts sing!
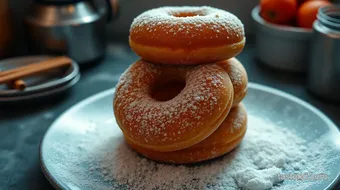
Perfect Presentation
Now that your doughnuts are brewed to perfection, let’s make them look as good as they taste! plating isn’t just for fancy restaurants.
A simple sprinkle of powdered sugar or a drizzle of a doughnut glaze variation can make them look chef-worthy right at home.
For garnishing, think colorful! fresh berries or even edible flowers can be a fun touch. i usually go for a mix of pink icing and colorful sprinkles—something about that combo makes my inner child jump for joy! remember, we eat with our eyes first, so a little care in presentation can really elevate your homemade treat.
Storage & Make-Ahead
Let’s keep those goodies fresh! after you whip up a batch of doughnuts, store them in an airtight container. they'll last a couple of days at room temperature.
If you've got leftovers (which, let’s be honest, is rare!), they can last up to a week in the fridge.
If you want to preserve them longer, freeze your doughnuts ! they freeze beautifully. just make sure to place parchment paper between each one before bagging them up.
When you're ready to indulge again, simply pop them in the toaster oven for a quick warm-up. they’ll taste almost fresh out of the fryer!
Creative Variations
Bored of the same old doughnuts? let’s spice up your breakfast with some cool adaptations. how about trying a seasonal twist? pumpkin spice in the fall or fresh lemon zest in the summer could be delightful.
For those sticking to gluten-free dishes, swap in a gluten-free flour blend. you won’t miss out on those delicious bites!
Want something different? Why not explore doughnut flavors to try ? Maple bacon doughnuts or matcha glazed doughnuts bring a whole new vibe to your table. Your taste buds will thank you!
Complete Nutrition Guide
Making your doughnuts can actually be healthier than buying them! you control the ingredients. each doughnut has about 210 calories , which isn’t bad for such a sweet indulgence.
Keep in mind if you go wild with the toppings, you might add to that calorie count, but hey, we’re here for the flavor, right?
Just be mindful of portion sizes. If you're serving it up for breakfast, pairing it with fresh fruit can add a nice boost of nutrition and balance out the sweetness.
Expert FAQ Solutions
You might have a few questions as you set out on your doughnut adventure. one common concern: “why are my doughnuts greasy?” 🧐 that usually means the oil is too cool when frying.
Make sure it’s right around 350° f .
Oh, and if you've got a bit of dough left over after cutting, don’t toss it. Just knead it again and make more doughnuts!
Bringing It All Together
So there you have it—the lowdown on making the perfect taste doughnuts at home! honestly, there’s nothing quite like that first bite, warm and delicious, just like the ones from the corner bakery.
.. but even better because you made them!
Grab your apron, roll up your sleeves, and let’s create some doughy goodness together. whether you're whippin’ these up for breakfast pastries or as a sweet treat for the kids, i promise it'll be a fun journey filled with sweet memories .
Happy frying!
Delightfully Soft Taste Doughnuts Card
⚖️ Ingredients:
- 2 ½ cups (312g) all-purpose flour
- ½ cup (100g) granulated sugar
- 1 tablespoon baking powder
- ½ teaspoon ground nutmeg
- ½ teaspoon salt
- 2 large eggs
- ½ cup (120ml) milk (whole or 2%)
- 2 tablespoons (28g) unsalted butter, melted
- 1 teaspoon vanilla extract
- 4 cups (960ml) vegetable oil (for frying)
- 1 cup (120g) powdered sugar (optional for glazing)
- 2 tablespoons (30ml) milk (optional for glazing)
- ½ teaspoon vanilla extract (optional for glazing)
🥄 Instructions:
- Step 1: In a large bowl, whisk together flour, sugar, baking powder, nutmeg, and salt.
- Step 2: In another bowl, combine eggs, milk, melted butter, and vanilla extract. Whisk until smooth.
- Step 3: Gradually add the wet ingredients to the dry ingredients, stirring until just combined.
- Step 4: Turn the dough out onto a floured surface and knead gently for about 2 minutes until smooth.
- Step 5: Form into a ball, wrap in plastic wrap, and let rest for 1 hour at room temperature.
- Step 6: In a deep pot, heat the oil to 350°F (175°C) over medium heat. Use a candy thermometer for accuracy.
- Step 7: Roll out the rested dough on a floured surface to about ½ inch thick.
- Step 8: Cut out doughnut shapes using a doughnut cutter or two round cutters.
- Step 9: Fry the doughnuts in batches, 2-3 minutes on each side until golden brown.
- Step 10: Use a slotted spoon to remove and transfer them to a cooling rack.
- Step 11: Whisk together powdered sugar, milk, and vanilla for a simple glaze.
- Step 12: Dip the warm doughnuts in glaze and let set on the rack.
Previous Recipe: Easy and Delicious Skinny Taste Chicken Salad: My Family's Favorite!
Next Recipe: Easy Classic Mint Ice Cream Cone: A Delicious Summer Delight