Heavenly Cheesecake Tray Recipe
Wondering how to impress your guests? Try this delightful cheesecake tray with creamy fillings and crunchy crusts! Perfect for parties and sweet cravings.

- Indulge in a Cheesecake Tray Adventure
- Essential Ingredients Guide for Your Cheesecake Tray
- Professional Cooking Method for Your Cheesecake Tray
- Pro Tips & Secrets to Cheesecake Bliss
- Perfect Presentation: Elevate Your Cheesecake Game
- Storage & Make-Ahead: Keep it Fresh!
- Creative Variations: Jazz It Up Your Cheesecake
- Complete Nutrition Guide: Know What You’re Eating
- Expert FAQ Solutions: Your Cheesecake Questions Answered
- Sweet Ending: You’ve Got This!
- Recipe Card
Indulge in a Cheesecake Tray Adventure
Oh my gosh, let me take you back to a cozy fall afternoon when a craving for something sweet turned into an unforgettable experience.
Picture this: i had friends coming over, and i wanted to impress them with something a little more fancy than your average cookies.
That’s when the idea of a cheesecake tray popped into my head. i mean, who doesn’t love mini cheesecakes ? they’re the perfect bite-sized treat, and honestly, when you present a diy cheesecake tray , everyone feels like they’re indulging in a gourmet experience.
So, what’s the scoop on this delicious idea? this isn’t just a recipe; it’s a way to bring people together.
A cheesecake tray lets you showcase a variety of flavors, from classic vanilla to the boldness of chocolate and the zing of lemon.
It’s a mix of nostalgia and creativity, perfect for any gathering—whether it’s a birthday bash or just a chill hangout.
Plus, life’s too short not to enjoy rich and creamy desserts, am i right?
The Sweet Story Behind Cheesecake
Cheesecake has been wowing taste buds for centuries. its roots trace back to ancient greece, where they served a version to athletes during the first olympic games.
Fast forward to today, and it’s evolved into a dessert everyone treasures. in america, it’s practically a staple, especially in the summer when bbqs and picnics call for easy dessert options .
Using this classic cheesecake recipe as a base, you can whip up a beautiful platter of individual cheesecake servings that not only taste amazing but make for a stunning dessert presentation too.
Time and Cost? Easy Peasy!
Let’s break it down. this cheesecake tray recipe takes about 30 minutes to prep, then an hour of baking and chilling time, giving you a total of around 2 hours from start to blissful finish .
Not to mention, a yield of 12 mini cheesecakes, which means you’ll have more than enough to wow your guests.
And your wallet won’t take a hit either—most ingredients are pantry staples! the cost is pretty light, making this a great option for those sweet treats on a budget.
Cheesecake Benefits and Beyond
Now let’s chat about why this cheesecake tray is the move. first off, the health benefits: cream cheese is a good source of calcium and protein, and when you add in fresh fruit toppings, you’re upping your nutrient game.
Plus, presenting a cheesecake with fruit toppings adds a refreshing touch that makes for a perfect balance of sweetness.
This dessert shines during special occasions. it stands out at parties, family gatherings, or even as a last-minute treat. you can easily switch up flavors, giving everyone a chance to pick their fave—whether they’re into chocolate or prefer a citrus burst.
And if you’re feeling adventurous, try out those easy cheesecake variations . add chocolate ganache or mix in some nuts for that extra flair!
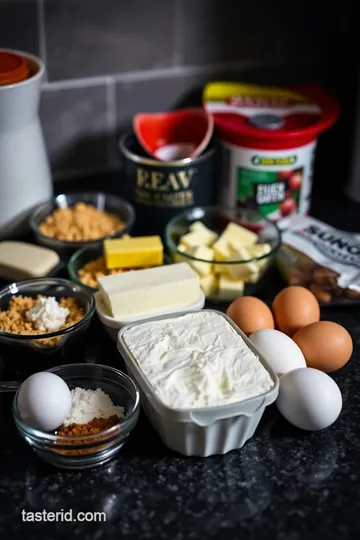
Time to Gather Your Ingredients
Alright, now that you’re sold on making your own cheesecake tray, it’s time to gather those ingredients. Here’s what you’ll need to bring this vision to life:
- For the crust: Graham cracker crumbs, sugar, and melted butter.
- For the filling: Cream cheese, sugar, eggs, and vanilla extract, along with your flavor choices.
Trust me, when you pull that tray out and see those delightful mini cheesecakes lined up, you’re going to feel like a culinary star.
Get ready to dazzle your friends and enjoy every creamy bite. now, let’s dive into the step-by-step instructions and make this cheesecake magic happen!
Essential Ingredients Guide for Your Cheesecake Tray
If you're diving into the world of cheesecakes, trust me, having a solid understanding of essential ingredients makes all the difference.
We’re not just talking about slapping things together; it’s about creating a rich, creamy, and delightful experience, whether you’re making a classic cheesecake recipe or whipping up a zesty no-bake cheesecake tray for your next gathering.
So, let’s break down what you need!
Premium Core Components
First up, let’s talk about those premium core ingredients .
-
Cream cheese (16 oz/450g) : this is your star player! look for a brand that promises a smooth texture —that’s key.
Room temperature is a must for blending. honestly, nothing’s worse than a lumpy cheesecake, right?
-
Graham Crackers (1 ½ cups/150g) : A classic for that crunch! Check for the freshness date; stale crackers just won’t cut it—trust me on this one!
-
Sugar (1 cup/200g) : Granulated for the best sweetness. If you fancy a different flavor profile , coconut sugar works in a pinch.
Storage Guidelines
Keep your cream cheese unopened in the fridge for up to two weeks past the ‘use by’ date. once out, use it promptly to ensure you're mixing up that rich and creamy dessert without a hitch.
Grahams can sit snug in their boxes for up to six months —just keep ‘em dry!
Signature Seasoning Blend
Getting the right seasonings is crucial, too. After all, a simple cheesecake can become a flavor powerhouse !
-
Vanilla extract (1 tsp) : Always use pure; the difference is mind-blowing.
-
Lemon Juice (2 tsp) : Adds that zing! But feel free to keep it out if you want a more classic vibe.
Now, let’s spice things up with some easy cheesecake variations —you could even drop in cocoa powder for when chocolate cravings hit!
Smart Substitutions
So you’re in the kitchen, and oh no—ran out of an ingredient? No sweat!
-
For graham cracker crust alternatives , try crushed Oreos for a chocolaty twist.
-
Dairy-free? Almond cream cheese and coconut milk can save the day. You can even bake mini cheesecakes for individual servings—perfect for parties!
Kitchen Equipment Essentials
Now, you can’t run a cheesecake operation without some key tools.
-
Mini cheesecake pan : These come in handy for changing things up a bit. No mini pan? Muffin tins with liners will do the trick!
-
Whisk or electric mixer : A must for achieving that silky smooth filling. I tried whisking by hand once... never again!
-
Measuring cups & spoons : Eyeballing your sugar might work for coffee, but not for cheesecake baking techniques .
Important Tips
-
Room Temperature Ingredients : This step is crucial! Warm cream cheese blends better and leads to fewer cracks. Take my word for it—I've learned this the hard way.
-
Cooling Time : Let your cheesecakes cool gradually at room temperature before hitting the fridge. It really helps in achieving that perfect texture.
-
Presentation Ideas : When serving your cheesecake tray , add fresh fruits or drizzles of caramel for a stunning display that’ll wow your guests. You’ll have them asking, “Where’s the recipe?”
So there you go! with these core ingredients , flavors , and handy kitchen tools , you’re ready to whip up the ultimate cheesecake tray.
Perfect for any celebration or just a tuesday indulgence. and trust me, there’s nothing quite like the satisfaction of serving a delicious cheesecake that looks as good as it tastes!
Next, let’s get into the step-by-step instructions for creating that heavenly cheesecake tray . Buckle up—the sweet journey is just beginning!
Professional Cooking Method for Your Cheesecake Tray
Creating a stunning cheesecake tray can feel like magic, especially when done right. i remember the first time i made mini cheesecakes for a party.
I was so nervous! but once i got my game plan down, it was easy-peasy. so let’s dive into the professional cooking methods to take your cheesecake game to the next level.
Essential Preparation Steps
Mise en Place Details
Before you even think about whipping that cream cheese, gather all your ingredients. this fancy term, “mise en place,” just means having everything ready to go.
For our cheesecake tray, you’ll need graham cracker crumbs, cream cheese, sugar, eggs, and maybe some zesty lemon juice if you’re feeling adventurous.
It’s kind of like setting up a cheat sheet before a big test!
Time Management Tips
Plan for 30 minutes of active prep time plus about 15 minutes for chilling the crust . that may sound like a lot, but hey, timing is everything! make sure you give yourself around two hours total to account for baking and cooling.
Organization Strategies
Keep your workspace tidy. It’s super easy to get lost in the clutter when you’re measuring and mixing. Trust me, half the battle is just knowing where your stuff is!
Safety Considerations
We all love a good treat, but let’s keep it safe! be careful with that oven. a good baking thermometer can save your cheesecake from going from creamy delight to a dry disaster.
Remember, you need that oven at a steady 325° f ( 163° c) for optimal baking.
Step-by-Step Process
-
Prepare the crust: start by preheating the oven and mixing those graham cracker crumbs with melted butter and sugar. press it firmly into your mini cheesecake pan.
Don’t forget to chill it for 15 minutes . pro tip: a little chill helps firm it up before adding that luscious filling.
-
Make filling: beat your softened cream cheese until it's smooth. it should have the consistency of really thick peanut butter.
Add sugar, eggs (one at a time!), vanilla extract, and some lemon juice if you want a zesty twist.
-
Fill Cheesecakes: Pour that heavenly filling into your crusts, filling them about ¾ full. You can layer in any other flavors you want—like chocolate or berry purees.
-
Bake: slide those bad boys into the oven and bake for 25- 30 minutes . the edges should be set, but if the center is still a little wobbly, that’s perfect! oh, the aroma wafting through the kitchen? it’s pure bliss.
-
Cool: let them cool at room temperature. then pop them in the fridge for at least one hour . this is where the magic happens; the cheesecakes firm up to that creamy consistency we all crave.
Expert Techniques
When you're baking, practicing these professional methods will set you apart.
- Water Bath Method: If you want to be extra fancy, try baking your cheesecakes in a water bath. It creates a steamy environment that helps avoid cracks.
- Don’t Overmix: Mix just until combined. Too much air will cause your cheesecake to crack. Yikes!
Success Strategies
Now let’s talk about some common pitfalls and how to dodge them.
- Common Mistakes to Avoid: Don’t skip the chilling process. If your crust isn’t firm, it’ll be a gooey mess. And please, for the love of cheesecake, don't rush the cooling!
- Quality Assurance Tips: Always taste as you go, especially when adding flavors. It’s your cheesecake, make it your flavor!
- Perfect Results Guide: Keep a close watch on baking times. If you're unsure, a little jiggle is actually a good sign!
- Make-Ahead Options: These mini cheesecakes can be made a day in advance. Just top them with your favorite toppings right before serving. Fresh berries, chocolate ganache, you name it!
Remember that sweet treats for gatherings always bring people together. Whether it’s a birthday, a holiday celebration, or just a casual dinner party, a cheesecake tray is sure to impress!
Whew! I could talk cheesecakes all day. So as we wrap up, let’s look at some additional information you might want to know to further perfect your tray.
Pro Tips & Secrets to Cheesecake Bliss
Oh my gosh, you guys! making a cheesecake tray filled with mini cheesecakes is not just fun; it’s a total game-changer for any gathering! alright, let's dive into some quick pro tips and secrets that’ll up your cheesecake game.
Firstly, room temperature ingredients are your best friends! ensure your cream cheese and eggs are nice and cozy before you start mixing.
Trust me, this little step can make a world of difference in getting a smooth, lump-free filling. and if you want to save time (who doesn’t?), pre-measure your ingredients before you begin.
You’ll feel like a kitchen ninja!
For flavor enhancement, oh boy, add a splash of vanilla extract or some lemon juice . it elevates the taste and gives your cheesecake that extra zing.
And here’s a secret: don't overmix. this pulls in too much air, which can lead to cracks. nobody wants a cracked cheesecake, right?
When it comes to presentation, let’s make that cheesecake tray drool-worthy! plating is an art. use a fancy platter, and don't shy away from garnishes like fresh mint or a sprinkle of powdered sugar.
They add color and make everything pop. and speaking of color, a mix of fruit toppings—think bright strawberries or rich blueberries—will make your tray look like a little heavenly garden.
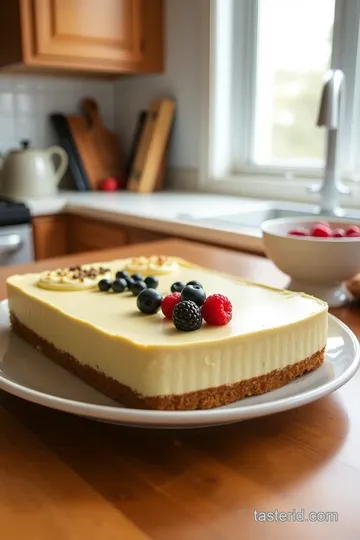
Perfect Presentation: Elevate Your Cheesecake Game
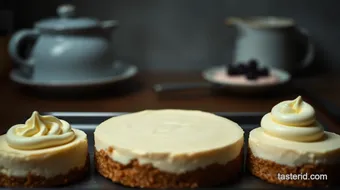
Presentation is key! seriously, it can turn a simple cheesecake into a gourmet experience. when serving your mini cheesecakes, focus on plating techniques .
Stack them up in different heights or create a little forest of mini cheesecakes on your tray. use varying colors to catch the eye—rich chocolate, zesty lemon, and classic vanilla—that’s a feast for the eyes!
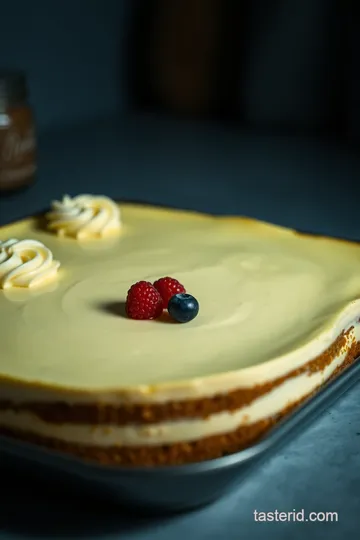
Don’t forget about garnishes ! fresh fruit, a drizzle of caramel, or even a packing of crushed nuts adds that wow factor.
Little touches like these make a big difference. also, try to use colorful plates or napkins underneath for added visual appeal—talk about stylish!
Storage & Make-Ahead: Keep it Fresh!
Let’s face it, sometimes life happens, and you need to make things ahead. here’s the scoop on storage and make-ahead techniques .
You can definitely prepare your cheesecake filling a day in advance. just keep it in the fridge in an airtight container.
And once you’ve baked those cute mini cheesecakes , they’ll keep well in the fridge for about 5 days.
For longer storage, you can freeze them! wrap each cheesecake securely in plastic wrap, then in foil. just pop them in the freezer—in that state, they can last up to 2 months.
When you’re ready, just pull them out and let them thaw in the fridge overnight. easy peasy!
Creative Variations: Jazz It Up Your Cheesecake
Oh, the creative variations you can make with this cheesecake tray! want something chocolatey? toss in some cocoa powder or melted chocolate in your filling for an easy chocolate cheesecake.
How about something fruity? layer on the cheesecake with fruit toppings – fresh mango, strawberries, or blueberries—talk about a burst of flavor!
And let’s not forget about seasonal twists. imagine a pumpkin cheesecake for fall or a refreshing lemon zest cheesecake in summer.
You can even switch up the crust. if you’re feeling adventurous, try a graham cracker crust alternative with crushed cookies or make a nut-based crust for a different spin.
Complete Nutrition Guide: Know What You’re Eating
Nutrition is important! so, here’s the lowdown on the nutrition guide for your cheesecake delights. each mini cheesecake is about 240 calories.
Not too shabby for a rich and creamy dessert! it has about 4g of protein and 15g of fat, making it a satisfying sweet treat, especially when you pair it with some fresh fruit for added fiber.
If you’re watching your sugar intake, consider using natural sugar alternatives. there are plenty of options out there to help tweak your classic cheesecake recipe without compromising flavor.
And remember, moderation is key! this rich dessert will hit the spot, but don’t forget to enjoy a variety of foods.
Expert FAQ Solutions: Your Cheesecake Questions Answered
Here’s where it gets real! you might have some burning questions about baking cheesecakes. if your cheesecake doesn’t come out just right, don’t stress! did it sink in the middle? that usually means it might’ve baked a bit too long or cooled too quickly.
Remember that slow cooling makes for a smoother texture.
And if you want a no-bake cheesecake tray ? just skip the oven and use a mix of cream cheese, whipped cream, and a sweetener.
Refrigerate, let it set, and voilà—your dessert is ready with half the effort!
Sweet Ending: You’ve Got This!
So there you have it—everything you need to create the most amazing cheesecake tray . from pro tips that’ll wow your friends to storage hacks and creative ideas, you’re ready! no matter if you want a simple mini cheesecake recipe or something deluxe, this guide has got you covered.
Now get in that kitchen, whip out your easy cheesecake variations , and make some magic happen! You got this! 🎉
Heavenly Cheesecake Tray Recipe Card
⚖️ Ingredients:
- 1 ½ cups (150g) graham cracker crumbs
- ½ cup (100g) granulated sugar
- ¾ cup (170g) unsalted butter, melted
- 16 oz (450g) cream cheese, softened
- 1 cup (200g) granulated sugar
- 3 large eggs
- 1 teaspoon pure vanilla extract
- 2 teaspoons lemon juice (optional)
🥄 Instructions:
- Step 1: Preheat the oven to 325°F (163°C). In a bowl, combine graham cracker crumbs, sugar, and melted butter.
- Step 2: Press the mixture firmly into the bottom of the mini cheesecake forms. Chill the crust in the refrigerator for 15 minutes.
- Step 3: In a large bowl, beat softened cream cheese until smooth. Gradually add sugar and beat until combined.
- Step 4: Add the eggs one at a time, mixing well after each addition. Incorporate vanilla extract and lemon juice.
- Step 5: Carefully pour the cream cheese filling over the chilled crusts, filling them about ¾ full.
- Step 6: Bake in the preheated oven for about 25-30 minutes, or until the edges are set but the center is slightly jiggly.
- Step 7: Allow the cheesecakes to cool completely at room temperature. Refrigerate for at least 1 hour before serving.
Previous Recipe: Easy Crispy Spelt Crackers: My Secret Herb-Infused Recipe
Next Recipe: How to Make Delicious Spanish Scones with Chorizo and Manchego