Kit Kat Tiramisu Delight
Looking for a fun twist on tiramisu? Try my Kit Kat Tiramisu Delight! This easy recipe layers coffee-soaked ladyfingers with creamy mascarpone and crunchy Kit Kats.

- A Sweet Twist: The Kit Kat Tiramisu Experience
- look into Into the Deliciousness: Recipe Overview
- Why You Need This Dessert in Your Life: Key Benefits
- Wrapping It Up With Ingredients
- Essential Ingredients Guide
- Mastering the Art of Professional Cooking: The Fun Side of Tiramisu
- Additional Recipe Information for Kit Kat Tiramisu Delight
- Recipe Card
A Sweet Twist: The Kit Kat Tiramisu Experience
Oh, let me tell you about the first time i tried kit kat tiramisu . it was a rainy sunday afternoon, and i was stuck inside, feeling a bit snacky.
I remembered some leftovers from the week, those crispy kit kat bars from my last grocery run. then i thought, "what if i shook things up a bit?" and that’s how this chocolatey, coffee-flavored delight came to life.
I was beyond excited because, honestly, who doesn’t love a no-bake dessert? plus, it’s layered, which means more room for deliciousness!
This mash-up of tiramisu variations is a sweet reminder that serious things can be made fun. the classic italian dessert transforms into a playful kit kat dessert recipe that feels special without being all fussy.
If you're here for a fun dessert with layers of excitement (and a little crunch), you’re in the right spot!
look into Into the Deliciousness: Recipe Overview
Tiramisu has been a beloved italian classic since who-knows-when, but let's fast forward a bit! with modern baking trends, we see more and more folks putting their spin on this traditional dish.
Today, you can find endless layered dessert ideas that keep the flavor without compromising on that delightful texture. this easy tiramisu recipe hits the sweet spot; it’s perfect for beginners and seasoned cooks alike.
You're looking at roughly 30 minutes of prep, plus 2 hours chilling time, so it’s not an all-day affair.
That's right; you’ll be enjoying this kit kat tiramisu delight in just a few hours! on a budget? no worries! this dessert won’t break the bank.
You probably have most of the ingredients lurking in your kitchen already, or they’re easy to grab at the store.
Why You Need This Dessert in Your Life: Key Benefits
Let’s chat about what makes this kit kat tiramisu so special. first and foremost, it’s an amazing treat for chocoholics.
The combination of kit kats with that heavenly mascarpone cheese makes every bite sing. did i mention the health benefits? hold on—before you think i went off the deep end, hear me out!
It’s made with delightful ingredients like heavy cream (who doesn’t love whipped cream desserts?) and mascarpone cheese . sure, it may not be a salad, but the use of coffee and a little bit of sugar means you'll get a boost of happiness just from indulging.
Plus, this dessert is perfect for sweetening up any gathering. whether you’re hosting a dinner party, celebrating an anniversary, or just looking for easy party desserts , this one hits all the right notes.
I mean, when was the last time you saw a dessert with kit kat assembly techniques ? this could be the unique dessert to impress your pals! make it at your next gathering, and watch it steal the spotlight.
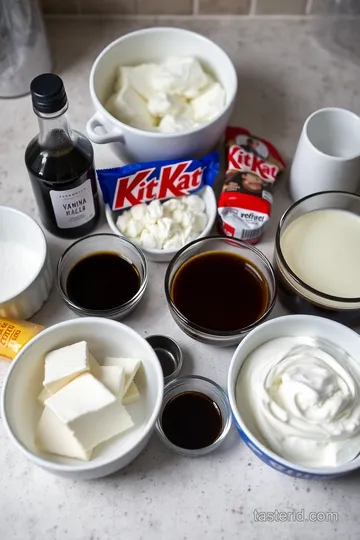
Wrapping It Up With Ingredients
Ready to dive in? this homemade tiramisu is just waiting for your touch. it all starts with simple ingredients you probably know by heart: ladyfingers, coffee, mascarpone, and, of course, kit kats ! so, gather your ingredients like a pro, and let’s dive into this chocolatey dream.
You won't want to miss out on these rich flavors combined with that iconic crunch.
Get excited to create something magical and share a little bite of happiness with everyone around you. recipes like this remind us to enjoy life’s little pleasures.
So, stay tuned, 'cause your kitchen adventures are about to begin!
Essential Ingredients Guide
So, you're ready to whip up something fabulous in the kitchen? let's dive into essential ingredients that elevate your cooking game without breaking the bank or your brain.
Whether you’re standing in your cozy kitchen ready to dazzle with a kit kat tiramisu or just trying to tackle a tuesday night dinner, knowing your ingredients is key.
Premium Core Components
Every delightful dish begins with the right components. First up, we want detailed measurements . Here’s a quick cheat sheet:
- 1 cup (240ml) of liquid is about 8 ounces.
- 1 tablespoon (15ml) is about 3 teaspoons.
Trust me, knowing these will save you from disastrous ratios!
Now, let’s talk quality. if you’re looking for quality indicators , fresh ingredients are always the way to go. take the time to check for the smell, color, and texture.
For example, fresh herbs should look vibrant and not wilty , while spices should be aromatic, not dusty.
Storage guidelines are also important. most dry spices last about 1-2 years in a cool, dark place. cooked items? generally, they need to be consumed within a week.
And hey, here’s a freshness tip: store your herbs in water like a mini bouquet to keep them perky!
Signature Seasoning Blend
Next, if you want those flavor bombs exploding in your mouth, let’s get into the signature seasoning blend ! you can’t go wrong with some classic spice combinations like salt, pepper, and garlic powder.
Pair those with seasonal herbs like basil and oregano for that italian flair.
You know what else? flavor enhancers like a splash of lemon juice or some soy sauce can transform a dull dish into something spectacular.
And if you’re feeling adventurous, why not dive into some regional alternatives? for instance, swap out italian seasonings for mexican ones when you want to bring the heat!
Smart Substitutions
The best chefs know their substitutions like old friends. sometimes you just don’t have the fancy stuff on hand, right? maybe your recipe calls for mascarpone cheese , but all you have is cream cheese.
No sweat, just blend in a bit of sour cream, and you’re golden!
If you're cooking for different diets, there are common alternatives for everything—like almond or oat milk instead of regular milk.
And whenever you’re in a pinch, try those emergency replacements . run out of ladyfingers for your tiramisu? use thick pancakes instead!
Kitchen Equipment Essentials
Now, let’s not forget about your kitchen tools ! seriously, you need the right gear to make life easier. a good mixing bowl and an electric mixer can be your best buds.
If you're short on space, just grab an all-purpose whisk—it works wonders too!
Storage solutions matter as well. Keep your tools organized; it’ll make your cooking way more fun. Consider investing in some drawer dividers so you can easily access what you need.
If you’ve got all your ingredients ready, you’re just a hop, skip, and jump away from making something awesome. I mean, who wouldn’t want to dive into a Kit Kat dessert recipe or some fun no-bake dessert ideas ?
We’ll soon get into the step-by-step for that delightful Kit Kat Tiramisu Delight . Ready your aprons, friends, because sweet treats for chocolate lovers are just a stir away!
Mastering the Art of Professional Cooking: The Fun Side of Tiramisu
Alright, friends! let’s dive into the world of professional cooking with a focus on one of my all-time favorite desserts – kit kat tiramisu delight ! this recipe has it all: rich flavors, creamy textures, and a playful twist that will have you coming back for seconds.
Essential Preparation Steps
First things first, let’s chat about mise en place. it sounds fancy, right? but it’s really just a french term for having everything ready before you start cooking.
Measure out all your ingredients: 1 ¼ cups of mascarpone cheese, 1 cup of heavy cream, and of course, those crunchy kit kat bars .
Next, time management is key. break down your tasks: brew your coffee while mixing ingredients. this is the perfect way to maximize your 30 minutes of active prep.
And, don’t forget to keep your workspace organized. clean as you go; it makes life a whole lot easier and helps you stay focused.
Safety tip: remember to keep your fingers away from those sharp knife edges when chopping the kit kats!
Step-by-Step Process
Ready to assemble? Here’s how it goes down:
-
Prepare the Mascarpone Filling :
- In a bowl, mix mascarpone cheese , sugar, and vanilla until smooth.
- In another bowl, whip the heavy cream until you get stiff peaks (around 3- 5 minutes ).
- Gently fold that whipped cream into your mascarpone mix until it’s all combined. Just look at that fluffy goodness!
-
Set Up Coffee Mixture :
- Brew your strong coffee (let it cool, folks!). If you’re feeling fancy, add a splash of coffee liqueur.
-
Assemble the Tiramisu :
- Dip each ladyfinger into the coffee mixture for 2 seconds ; be quick!
- Lay half of those soaked cookies in a 9x9-inch baking dish .
- Spread half of your mascarpone filling on top, then sprinkle those broken Kit Kat pieces.
- Repeat with another layer of ladyfingers, mascarpone and top with more Kit Kats .
-
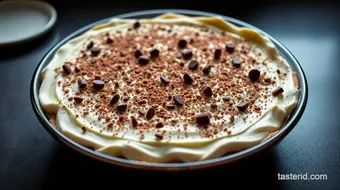
Chill and Finish :
- Pop that masterpiece in the fridge for at least 2 hours . Trust me, it’s worth the wait. Before serving, dust some cocoa powder on top for that Instagram-ready finish.
Expert Techniques
Alright, let’s level up. If you want to bring that homemade tiramisu to new heights, here are some tips:
- Sponge Control : Don’t drown those ladyfingers; just a quick dip keeps them firm.
- Attention to Chill Time : For even better flavors, let it sit in the fridge overnight.
- Presentation Is Key : Use a sharp knife for clean cuts and hint – wipe your knife after each slice for a cleaner finish.
And hey, if you mess up, no worries! If the layers don’t look perfect, just call it “rustic” – it’s all about the taste.
Success Strategies
Now let’s chat about a few common pitfalls:
- Don’t over-soak your ladyfingers; soggy is not the vibe you’re going for.
- Make sure your heavy cream is cold before whipping; that’s how you get that light texture.
- If you want that perfect chocolatey goodness, consider playing with flavors or adding some chocolate mousse layers in the middle.
This kit kat tiramisu is one of those unique tiramisu recipes that’ll impress your friends at game night or holiday parties.
And guess what? you can even prep some of it ahead of time. just keep everything chilled and assemble it right before serving!
Wrapping It Up
So there you have it, a rundown on the professional cooking method paired with my favorite kit kat dessert recipe ! this easy tiramisu recipe is perfect for those who love rich, coffee-flavored desserts with a fun, crunchy twist.
You'll surely blow everyone's mind with your culinary creativity and those layered dessert ideas make it even more enticing.
Next, I’ll share some additional information on how to elevate your dessert game even further. Stay tuned, dessert lovers!

Additional Recipe Information for Kit Kat Tiramisu Delight
Pro Tips & Secrets
Oh my gosh, let's talk pro tips for our kit kat tiramisu! first off, you wanna fold the whipped cream into the mascarpone gently.
This step ensures your filling is light and airy . so, don’t stir too hard; we’re not making a smoothie!
Then, about the ladyfingers, a quick dip in the coffee is all you need— like 2 seconds on each side .
If you soak them too long, you’ll end up with a mushy mess! also, if you want to cut down on chill time, pop your assembled masterpiece in the freezer for about an hour.
Boom! dessert ready in no time!
For flavor enhancement, consider ditching the traditional coffee liqueur and going wild with chocolate liqueurs instead; a splash of that will rock your world! seriously, chocolate + coffee is like a match made in heaven.
And lastly, don’t underestimate the power of a light dusting of cocoa powder on top. it not only looks stunning but also gives a nice bitter contrast to the sweet layers.
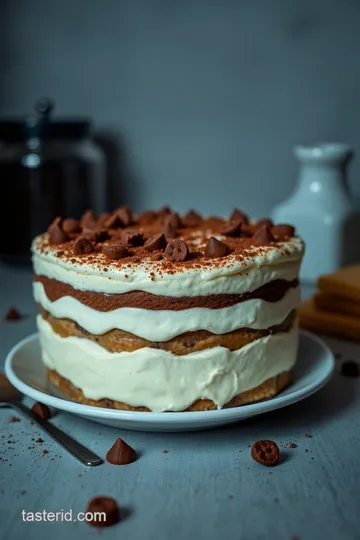
Perfect Presentation
Now, onto presentation ! remember, we eat with our eyes first. slice your tiramisu into squares, and don’t forget to clean your knife between cuts.
You want those clean lines! for garnishing, maybe add some crushed kit kats on top or fresh berries for a pop of color.
Colors are everything, right? a rich brown from the cocoa powder, a creamy white from the mascarpone, and bright pink or red berries? yes, please! cute little mint leaves can be a great final touch, too.
Presentation isn’t just about looks; it ups the flavor experience. who doesn’t want their dessert to taste even better just because it looks fabulous?
Storage & Make-Ahead
Alright, let’s chat about storage . this kit kat tiramisu can hold its own in the fridge for about 3 days .
Just make sure it’s well covered; nobody wants a dry dessert. if you want to make it ahead of time, you totally can! prep it up to 2 days in advance.
The flavors actually meld together and get even better!
To reheat? just kidding, we don’t heat this beauty. serve it cold after chilling; that’s part of the charm! if you’ve got any leftovers, slice 'em up for easy snacking.
Who doesn't love a quick dessert fix?
Creative Variations
Let's get creative ! this isn't just a one-trick pony. want a different flavor twist? instead of kit kats, try oreos for a fun oreo tiramisu.
Or toss in some seasonal fruits like fresh strawberries or peaches for a summer vibe. you could even try a mocha flavor by adding a layer of chocolate mousse.
Talk about elevating your game!
Got dietary needs? no problem! swap out the mascarpone for dairy-free cream cheese if you’re going vegan or gluten-free ladyfingers if you want to stick to a gluten-free lifestyle.
There’s no such thing as a “wrong” way to make this dessert!
Complete Nutrition Guide
These tasty layers come with some nutrition info, too. each serving of kit kat tiramisu typically packs around 320 calories .
Not the healthiest, but hey, it’s a dessert, right? it has around 22g of fat and 5g of protein —a chocolate lover's slice of heaven!
Always consider moderation when indulging in sweet treats. Maybe enjoy your slice with a side of berries for added freshness, or with a nice cup of coffee to complement those coffee notes.
Expert FAQ Solutions
Got questions? i got your answers! for key troubleshooting tips: if your layers seem wobbly, it might be due to too much liquid in your coffee.
Keep it strong but don’t go overboard! if you want to build confidence with this dessert, practice your layering. beautiful layers come with practice, trust me.
If your mascarpone filling isn’t thickening up, whip that cream longer or try chilling your bowl before mixing. And for variations, feel free to get creative! Search for unique tiramisu recipes and make it a fun challenge!
Conclusion
So there you have it, a full scoop on making the best kit kat tiramisu delight . this dish is more than just a sweet treat; it's a journey in the kitchen! it’s all about having fun, experimenting, and making memories with friends and family.
So grab those ingredients, unleash your inner chef, and let’s whip up some magic! enjoy and indulge in those yummy layers, my sweet treat lovers! happy cooking!
Kit Kat Tiramisu Delight Card
⚖️ Ingredients:
- 1 ¼ cups (300g) mascarpone cheese
- 1 cup (240ml) heavy whipping cream
- ¼ cup (50g) granulated sugar
- 1 tsp (5ml) vanilla extract
- 1 cup (240ml) strong brewed coffee, cooled
- 1 tbsp (15ml) coffee liqueur (optional)
- 24-30 ladyfingers (savoiardi)
- 4-6 full-size Kit Kat bars, broken into pieces
- Unsweetened cocoa powder, for dusting
🥄 Instructions:
- Step 1: In a mixing bowl, combine mascarpone cheese, granulated sugar, and vanilla extract.
- Step 2: Whip the heavy cream separately until stiff peaks form.
- Step 3: Gently fold the whipped cream into the mascarpone mixture until fully combined.
- Step 4: Brew the coffee and allow it to cool. If using, stir in coffee liqueur.
- Step 5: Quickly dip each ladyfinger into the coffee mixture, ensuring they are soaked but not soggy (approximately 2 seconds each side).
- Step 6: Layer half of the soaked ladyfingers at the bottom of a 9x9-inch (23x23 cm) baking dish.
- Step 7: Spread half of the mascarpone filling over the ladyfingers.
- Step 8: Add a layer of broken Kit Kat pieces evenly over the filling.
- Step 9: Repeat with another layer of soaked ladyfingers, the remaining mascarpone filling, and more Kit Kat pieces on top.
- Step 10: Cover the dish with plastic wrap and chill in the refrigerator for at least 2 hours.
- Step 11: Before serving, dust the top with cocoa powder using a sifter.
Previous Recipe: How to Create a Delicious Banh Mi Platter for Every Gathering
Next Recipe: How to Make a Santa Fe Omelet: Deliciously Easy Recipe to Try!